Configuration
Objective: Configuration of Master Screens needs to be done prior to record any Incident, Near-miss, HSE Observation and Safety Patrol, Management Safety Patrol and to execute cycle further.
NEW EMPLOYEE CONFIGURATION
CREATE NEW EMPLOYEE
Objective: It allows Administrator to create new Employee(s). Update/view existing New Employee(s) in the system.
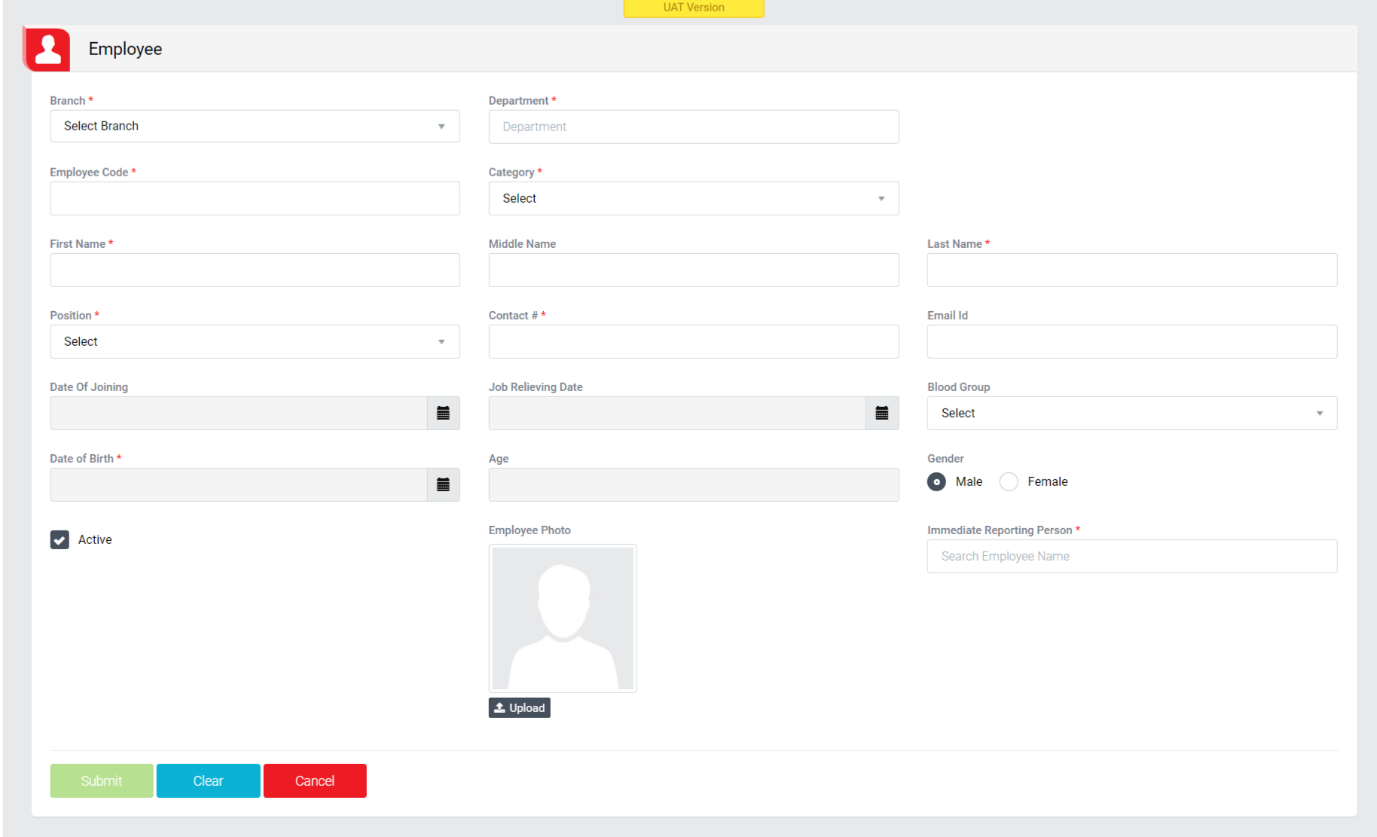
Image 1
- Select Branch from drop down list.
- Enter Department.
- Enter Employee Code.
- Select Category from drop down list.
- Enter First Name, Middle Name and Last Name.
- Select Position from drop down list.
- Enter Contact number.
- Enter valid Email Id.
- Select Date of Joining from date field.
- Select Job Relieving Date from date field.
- Select Blood Group from drop down list.
- Select Date of Birth. Age will be displayed upon selection of Date of Birth.
- Select Gender.
- Check/uncheck “Active” check box to make an Employee active/inactive.
- Click Upload button to upload employee picture.
- Enter Immediate Reporting Person name.
- Click Save button to save the Employee details
- Click Clear button to clear all the entry fields.
- Click Cancel button to cancel the entry without save.
EMPLOYEE RECORDS
Objective: It allows Administrator to update/view existing Employee(s) in the system. To update/view Employee details, open Employee Record screen from configuration menu.
UPDATE EXISTING EMPLOYEE
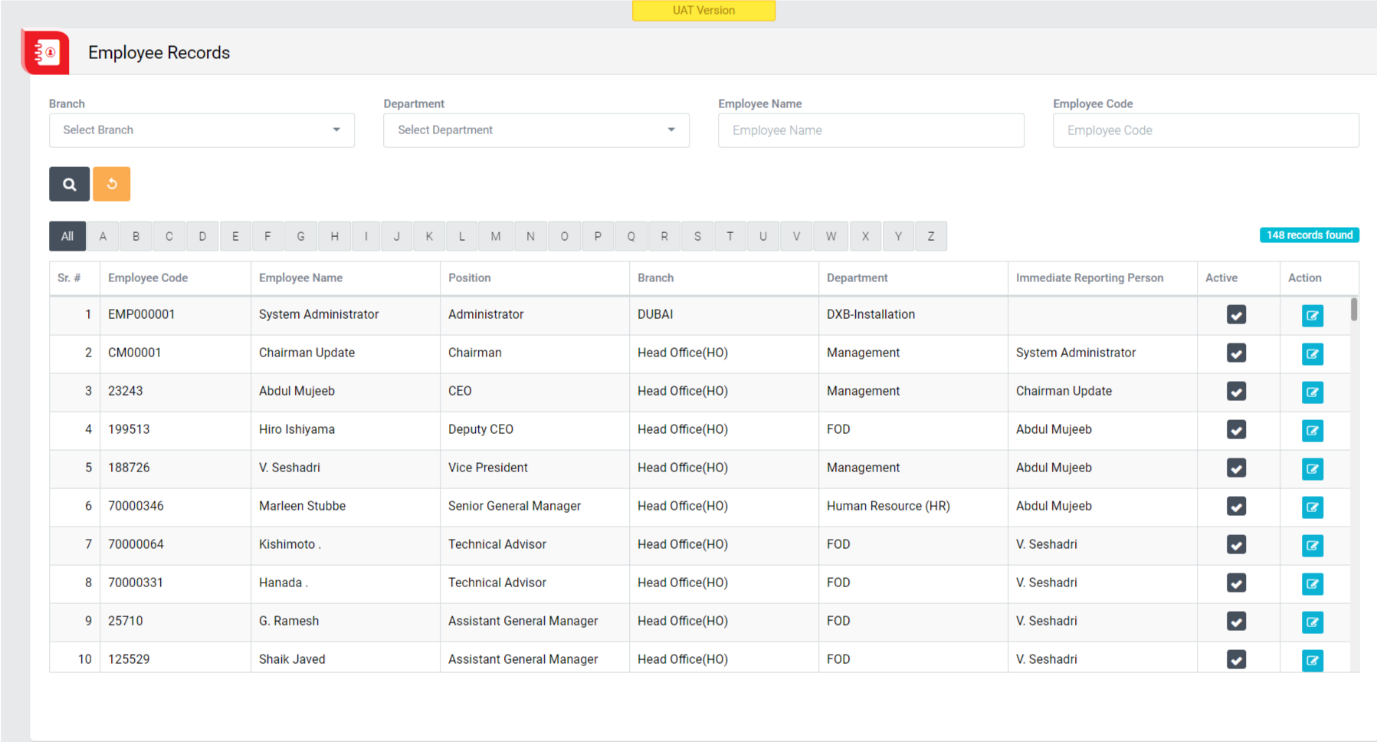
Image 2
- To update/edit existing Employee, click on “Edit” button in Action column to go to Employee screen with all the details of a particular employee (Image 2).
- Change the Employee details as per requirement (Image 3).
- Click Update button to update existing employee (Image 3).
- Click Clear button to clear the details to facilitate entry of a new employee (Image 3).
- Click Cancel button to go back to Employee Record screen without updating record (Image 3).
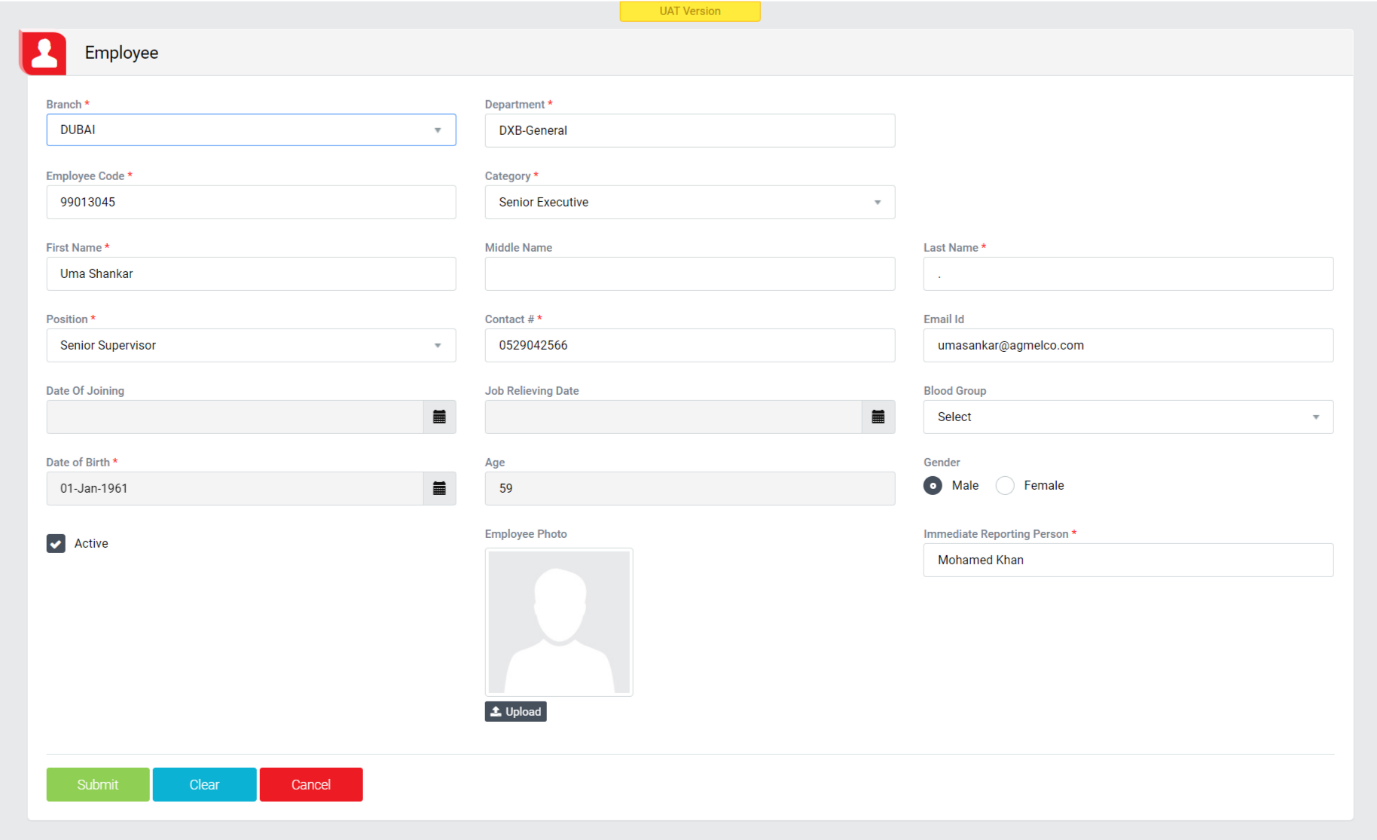
Image 3
VIEW EXISTING EMPLOYEE

Image 4
- Select search criteria as per the requirement.
- Click Search button to populate employee details as per criteria selected.
- Click Refresh button to clear search criteria and show the screen in normal view.
- Click the alphabets A-Z to view the user alphabetically.
- Click All to show all the users in the table.
- Click Employee Name, Position, Branch, Employee Code, Department and Immediate Reporting Person header on Employee Details table to view the Employee Name, Position, Branch, Employee Code, Department and Immediate Reporting Person header in ascending/descending order.
- Employee can be made Active/In-Active by clicking “Active” button in Employee Details table in Active column.
- Click Export to Excel button to export Employee detail to excel spread sheet.
USER CONFIGURATION
CREATE NEW USER
Objective: It allows Administrator to create new user(s). Update/view existing user(s) in the system.

Image 1
- To configure new user, open user screen from configuration/Employee menu.
- Enter Employee Name or Code in Autocomplete
- Employee Type, Department will configured based on selected Employee.
- Enter Username, Password.
- Check/uncheck “Is Active Directory User ?” check box to make user as AD User.
- Check/uncheck “Active” check box to make a user active/inactive.
- Click Add Role button to assign role to user.
- Select Role to assign role to user.
- Select Level from dropdown.
- Click Save button to save the user details.
- Click Clear button to clear all the entry fields.
- Newly created level is displayed in table once user is saved.
UPDATE EXISTING USER
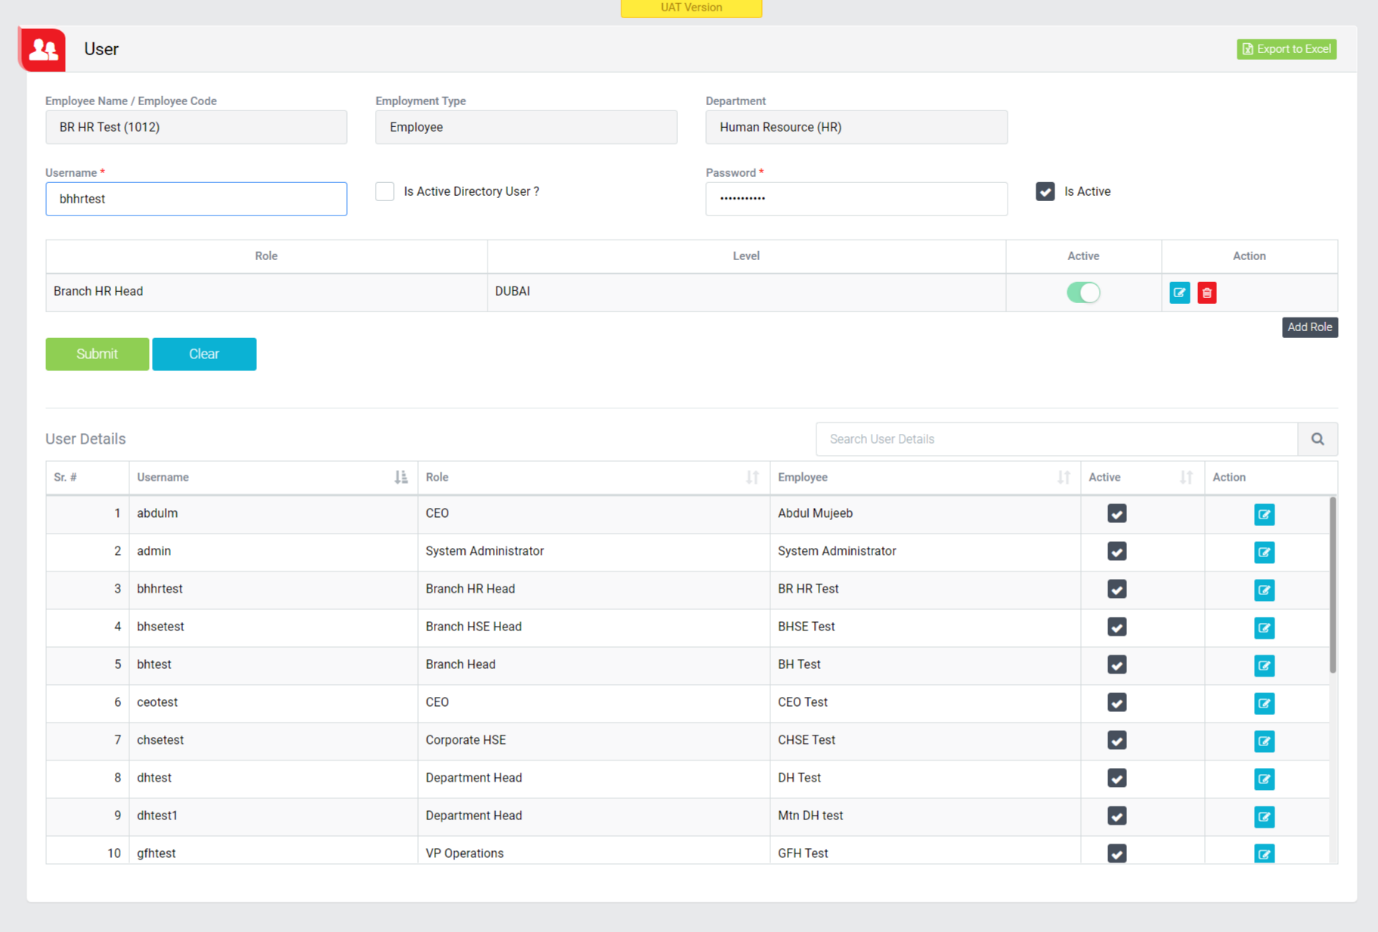
Image 2
- To update/edit existing user, click on “Edit” button in Action column.
- Change the user details as per requirement.
- Click Update button to update existing user.
- Click Clear button to clear the details to facilitate entry of a new user.
VIEW EXISTING USER
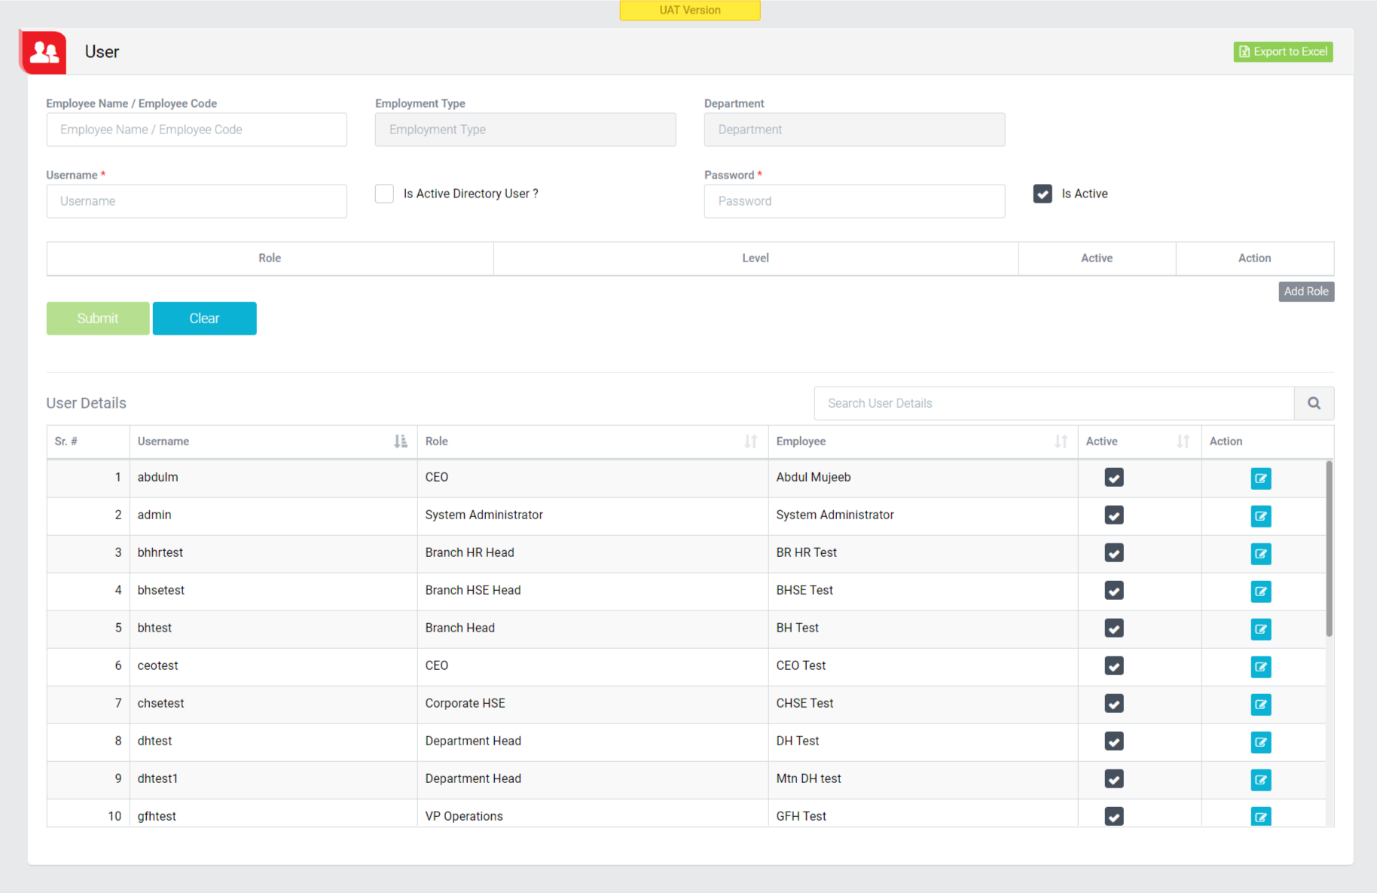
Image 3
- Click User Name, Role and Employee header on Level details table to view the User Name, Role and Employee in ascending/descending order.
- User can be made Active/In-Active by clicking “Active” button in Level details table.
EMPLOYEE IMPORT
CREATE NEW EMPLOYEE
Objective: It allows Administrator to create new Employee(s) through Import functionality.
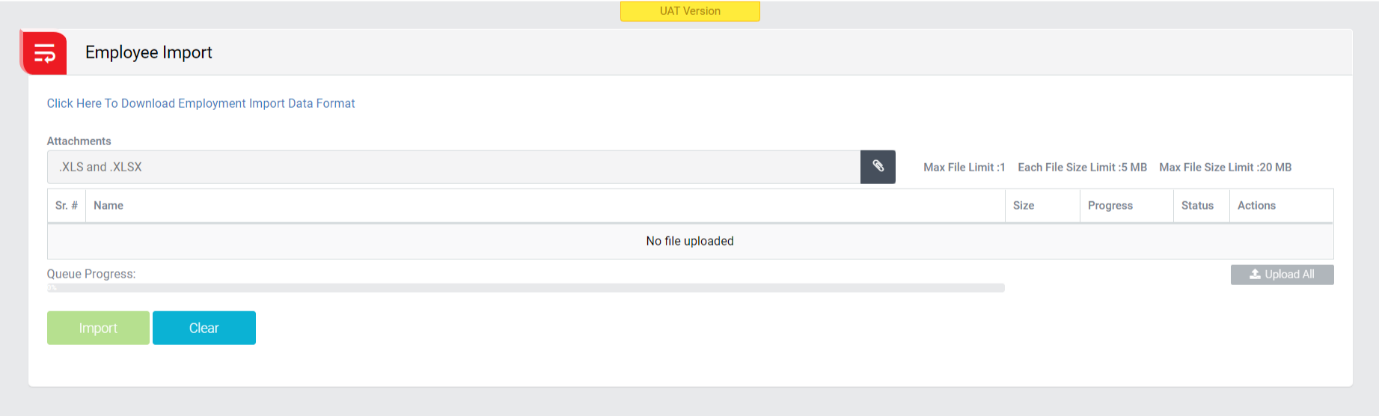
Image 1
- Click on “Click Here To Download Employment Import Data Format” to get formate of data.
- After that add that attachment and upload it.
- Click on Import to Import that Employees.
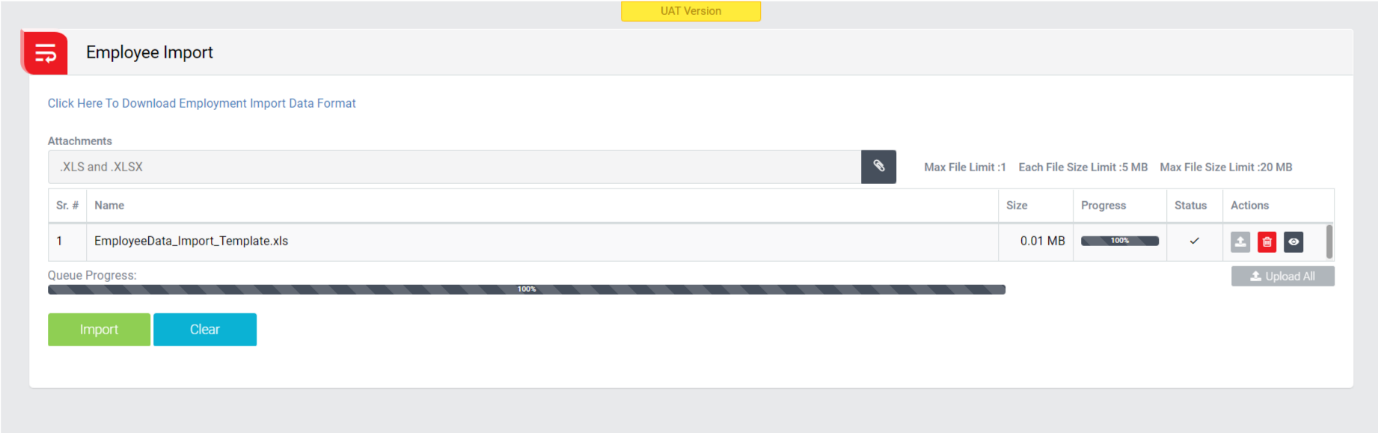
Image 2
- See Imported data in Employee Records.
LEVEL CONFIGURATION
CREATE NEW LEVEL
Objective: It allows Administrator to create new level(s). Update/view existing level(s) in the system.

Image 1
- To configure new level, open level screen from configuration menu.
- Select Hierarchy and Parent from dropdown.
- Enter Level Name and Level Code.
- Check/uncheck “Active” check box to make a level active/inactive.
- Click Save button to save the level details.
- Click Clear button to clear all the entry fields.
- Newly created level is displayed in table once level is saved.
UPDATE EXISTING LEVEL
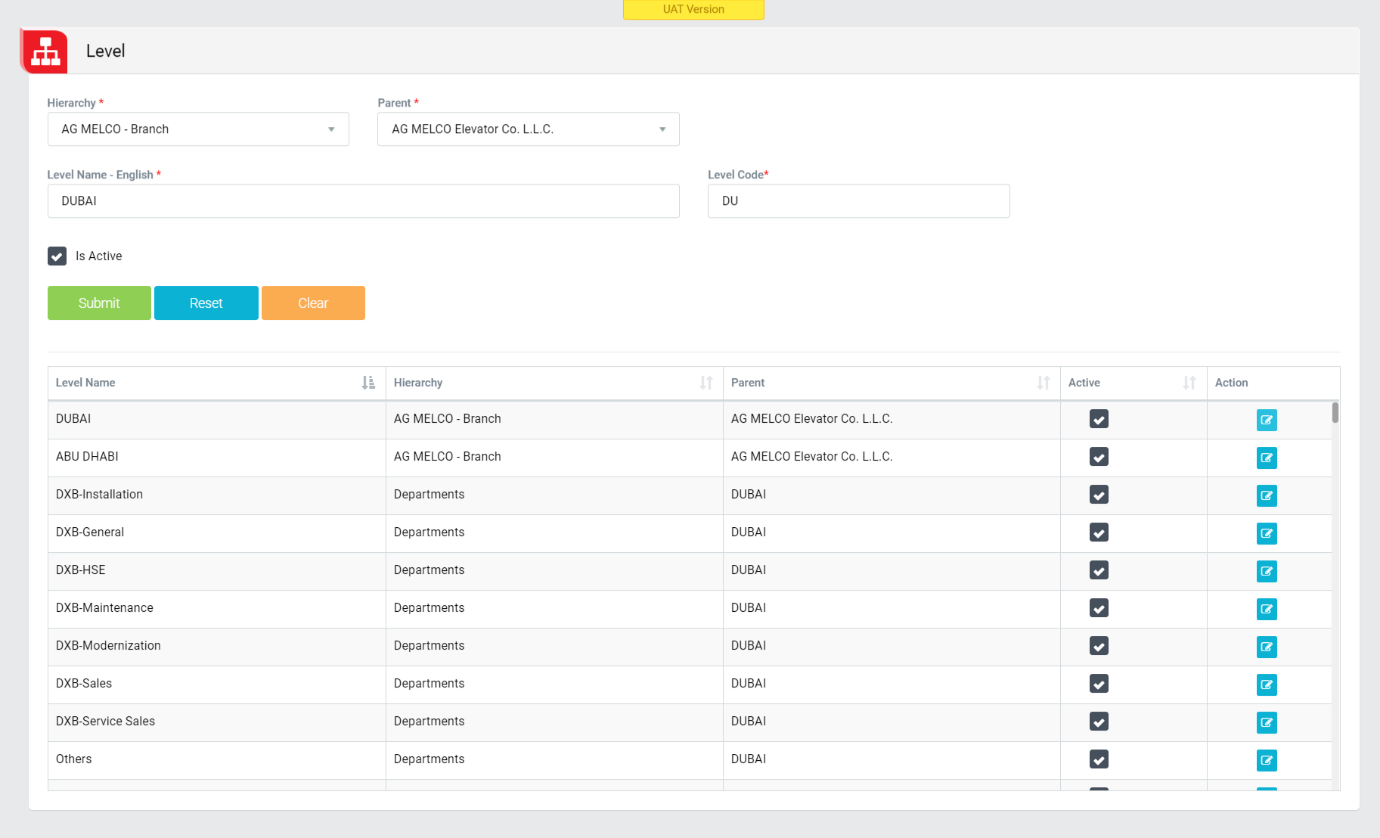
Image 2
- To update/edit existing level, click on “Edit” button in Action column.
- Change the level details as per requirement.
- Click Update button to update existing level.
- Click Clear button to clear the details to facilitate entry of a new level.
VIEW EXISTING LEVEL
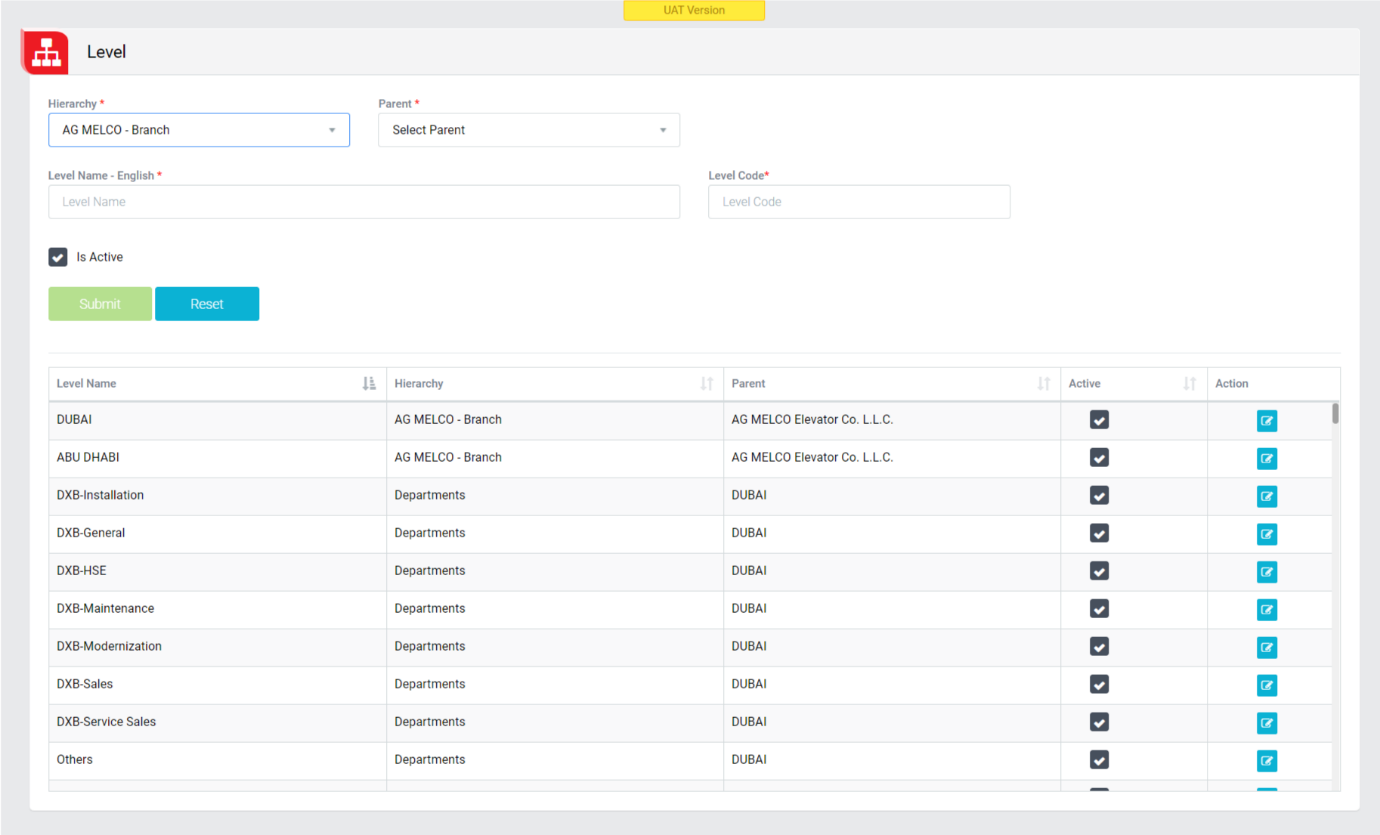
Image 3
- Click Level Name, Hierarchy and Parent header on Level details table to view the levels in ascending/descending order.
- Level can be made Active/In-Active by clicking “Active” button in Level details table.
ROLE CONFIGURATION
Objective: It allows Administrator to Update/view existing role(s) in the system.
- It allows Administrator to Update/view existing role(s) in the system.
- Various Roles associated with or working with a user.
UPDATE EXISTING ROLE
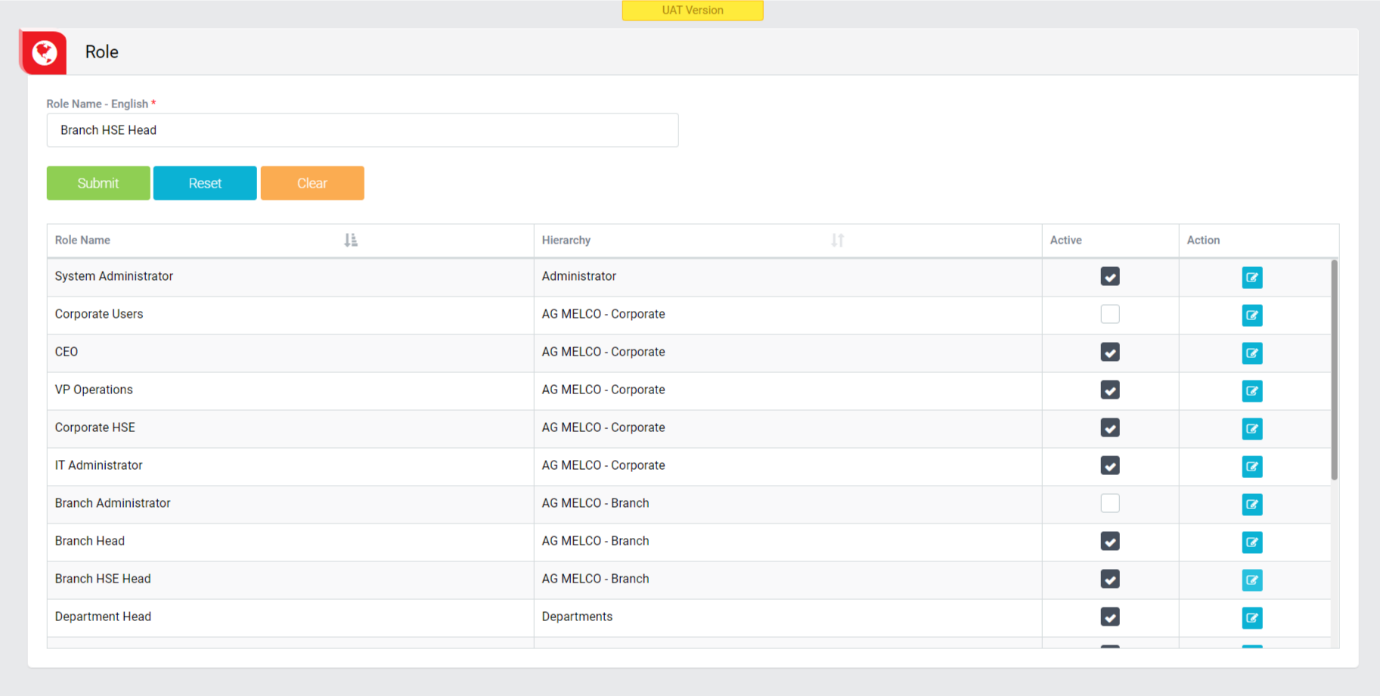
Image 2
- To update/edit existing role, click on “Edit” button.
- Change the role details as per requirement.
- Click Update button to update existing role.
- Click Clear button to clear the details to facilitate entry of a new role.
VIEW EXISTING ROLE
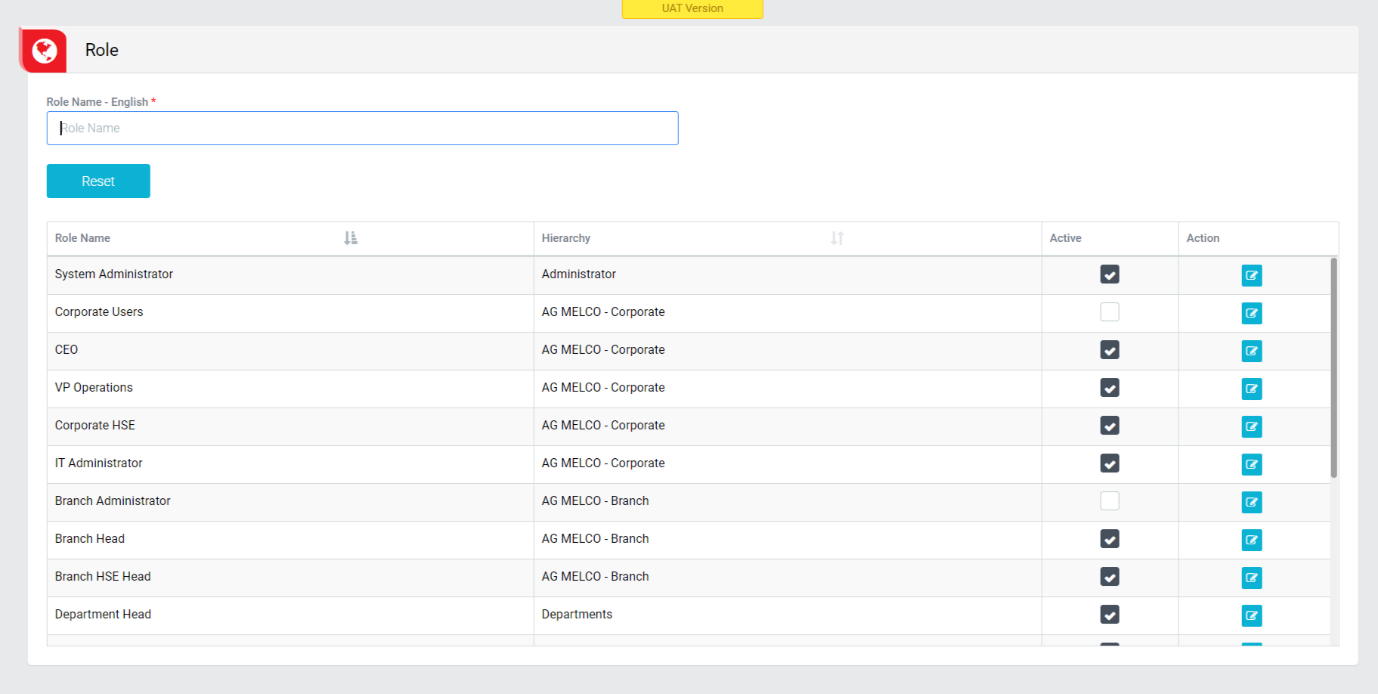
Image 3
- Click Role Name and Hierarchy header on table to view the Role Name and Hierarchy in ascending/descending order.
- Role can be made Active/In-Active by clicking “Active” button in Role details table.
INCIDENT/NEAR-MISS CAUSE MASTER
Objective: It allows Administrator to add causes for Incident/Near-miss modules
CREATE NEW CAUSE

Image 1
- To configure new Cause, open Causes Master screen from configuration/Incident menu.
- Select Causes Type, Parent, Sub parent from dropdown.
- Enter Cause Name.
- Check/uncheck “Active” check box to make a cause active/inactive.
- Click Save button to save the causes details.
- Click Clear button to clear all the entry fields.
- Newly created holiday is displayed once causes is saved.
UPDATE EXISTING CAUSES
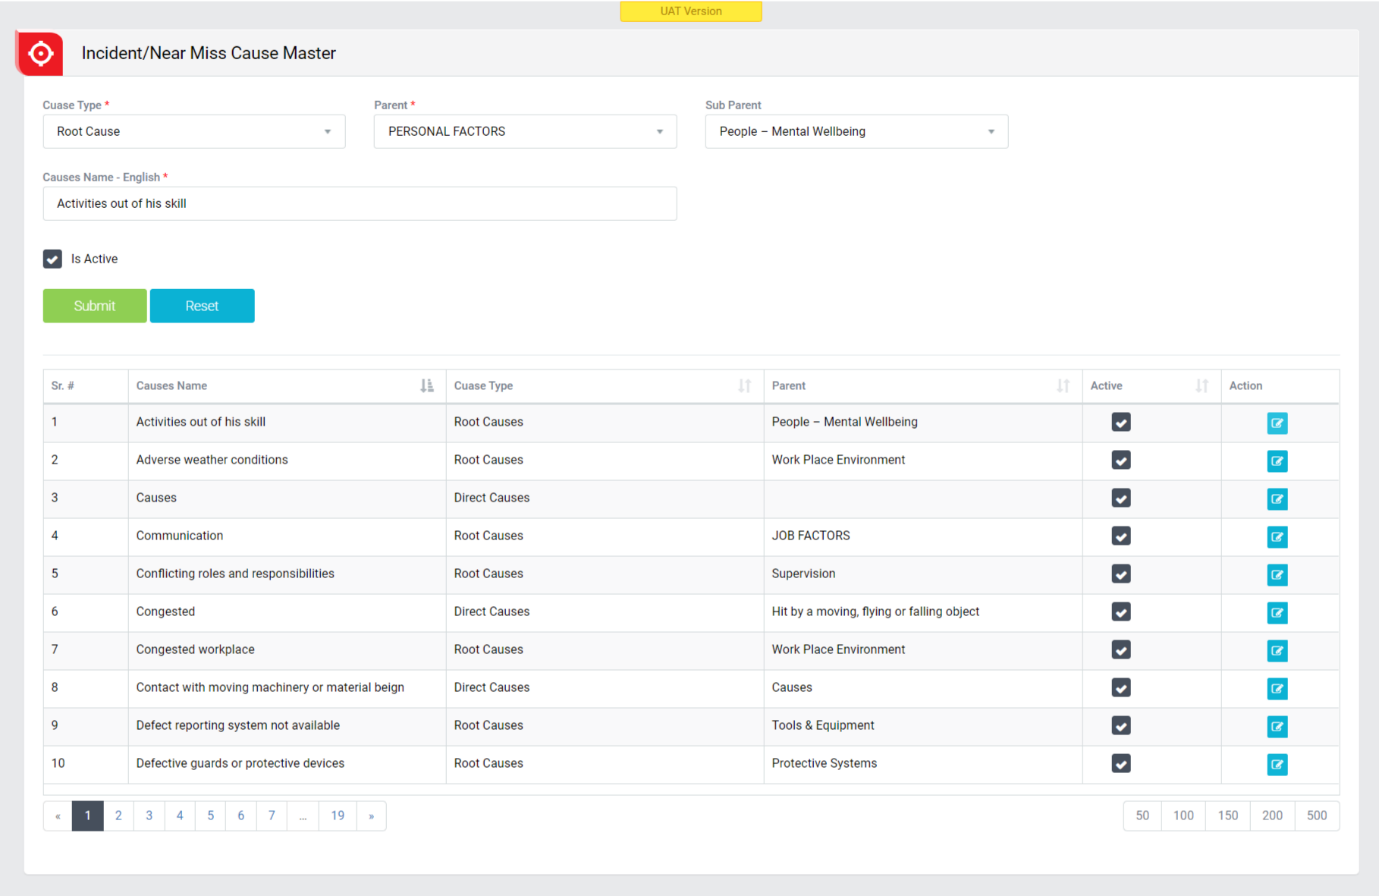
Image 2
- To update/edit existing causes, click on “Edit” button.
- Change the causes details as per requirement.
- Click Update button to update existing cause.
- Click Clear button to clear the details to facilitate entry of a new cause.
VIEW EXISTING CAUSES
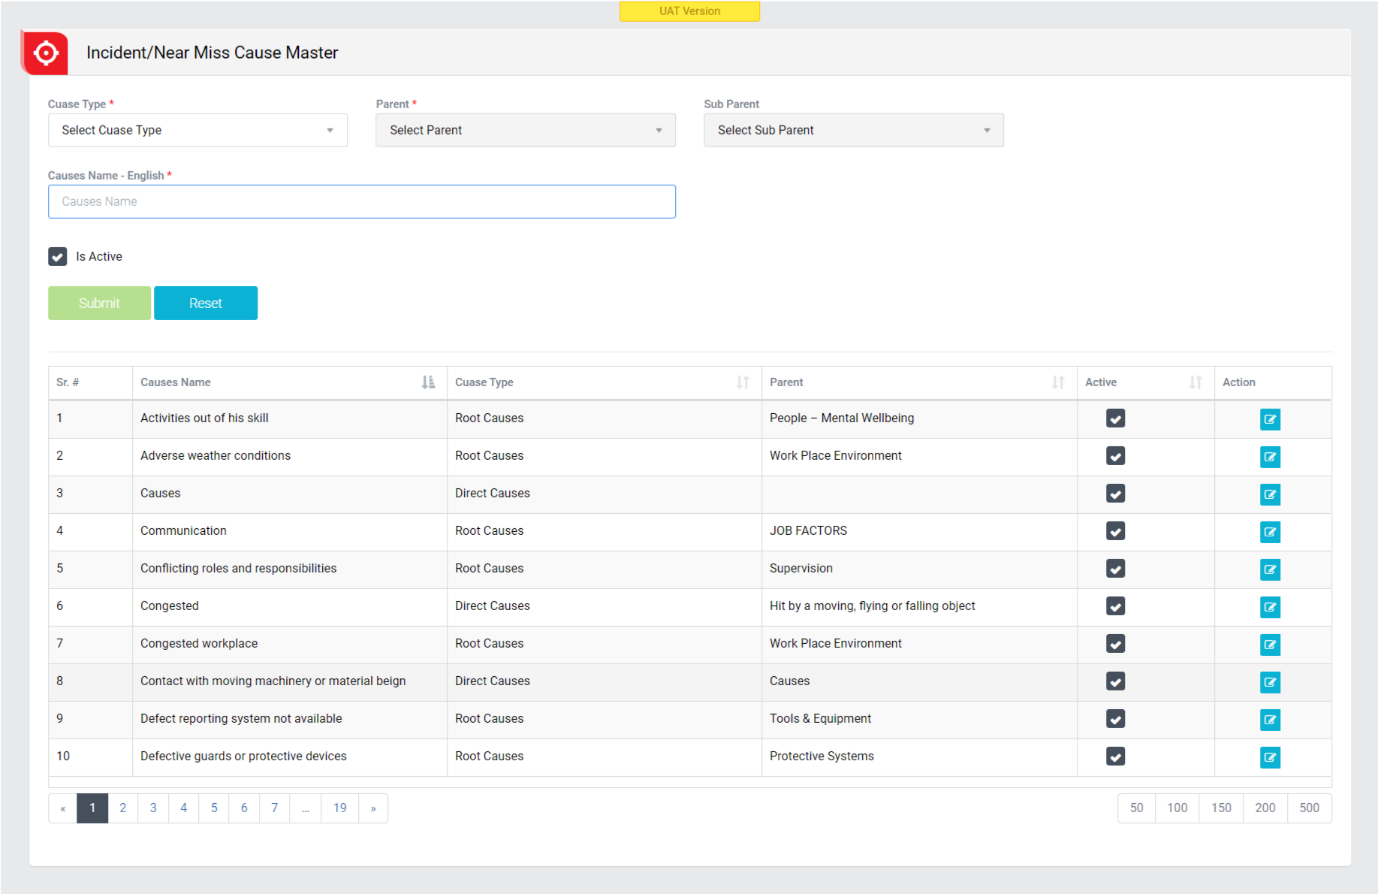
Image 3
- Click Cause Name, Cause Type and Parent header on table to view the Cause Name, Cause Type and Parent in ascending/descending order.
- Causes can be made Active/In-Active by clicking “Active” button in table.
INCIDENT/NEAR-MISS EQUIPMENT AND MATERIAL MASTER
Objective: It allows Administrator to add equipment and material for Incident/Near-miss modules.
CREATE NEW EQUIPMENT AND MATERIAL

Image 1
- To configure new Equipment and Material, open Equipment and Material Master screen from configuration/Incident menu.
- Select Involved Type from dropdown.
- Enter Description.
- Check/uncheck “Active” check box to make a equipment and material active/inactive.
- Click Save button to save the equipment and material details.
- Click Clear button to clear all the entry fields.
- Newly created equipment and material is displayed once equipment and material is saved.
UPDATE EXISTING EQUIPMENT AND MATERIAL

Image 2
- To update/edit existing equipment and material, click on “Edit” button.
- Change the equipment and material details as per requirement.
- Click Update button to update existing equipment and material.
- Click Clear button to clear the details to facilitate entry of a new equipment and material.
VIEW EXISTING EQUIPMENT AND MATERIAL

Image 3
- Click Description and Involved type on table to view the Description and Involved type in ascending/descending order.
- Equipment and Material can be made Active/In-Active by clicking “Active” button in table.
INCIDENT/NEAR-MISS EQUIPMENT AND MATERIAL MASTER
Objective: It allows Administrator to add equipment and material for Incident/Near-miss modules.
CREATE NEW EQUIPMENT AND MATERIAL
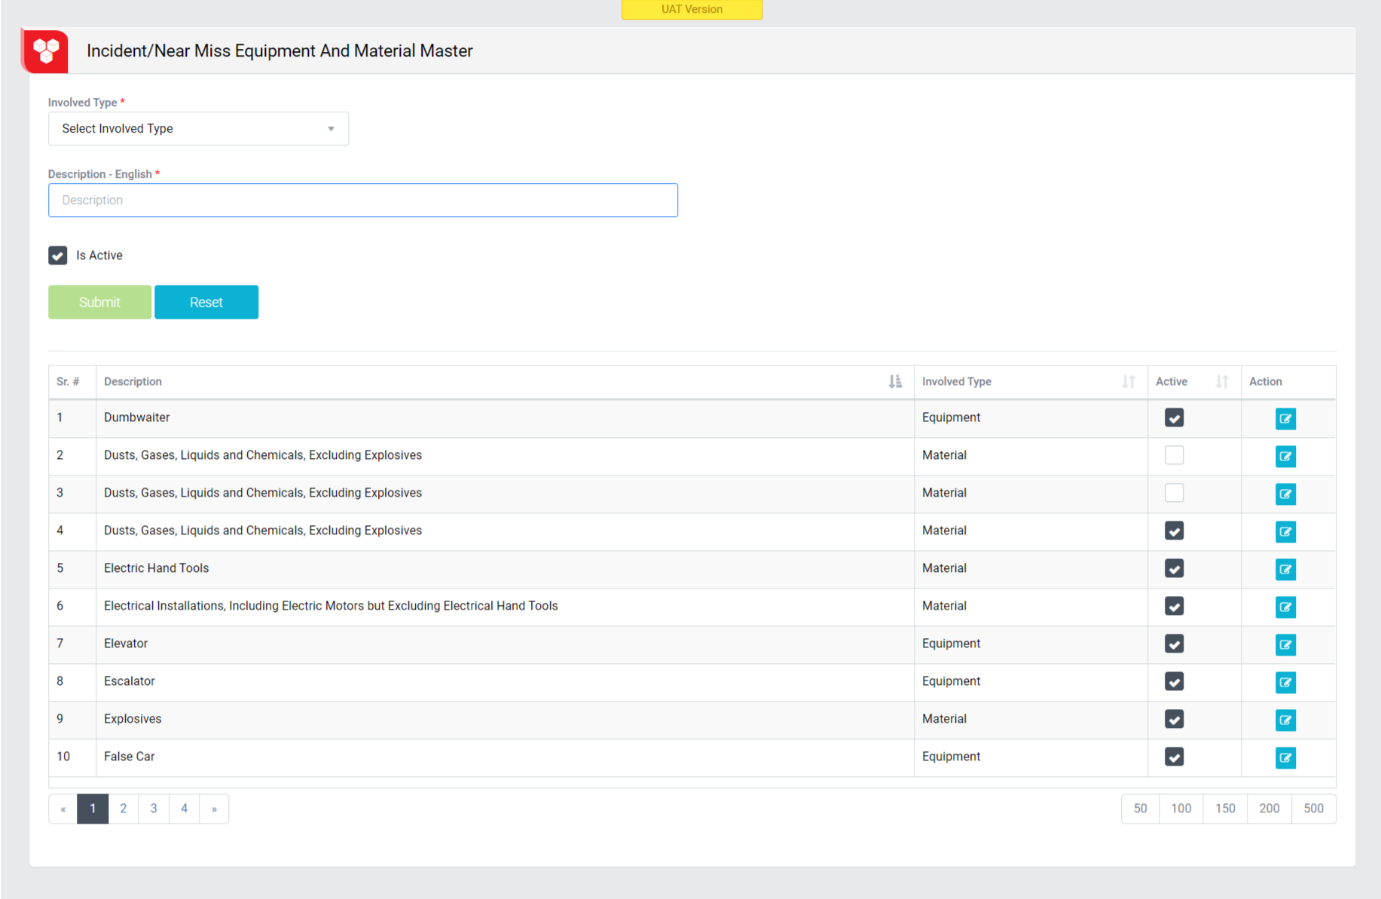
Image 1
- To configure new Equipment and Material, open Equipment and Material Master screen from configuration/Incident menu.
- Select Involved Type from dropdown.
- Enter Description.
- Check/uncheck “Active” check box to make an equipment and material active/inactive.
- Click Save button to save the equipment and material details.
- Click Clear button to clear all the entry fields.
- Newly created equipment and material is displayed once equipment and material is saved.
UPDATE EXISTING EQUIPMENT AND MATERIAL
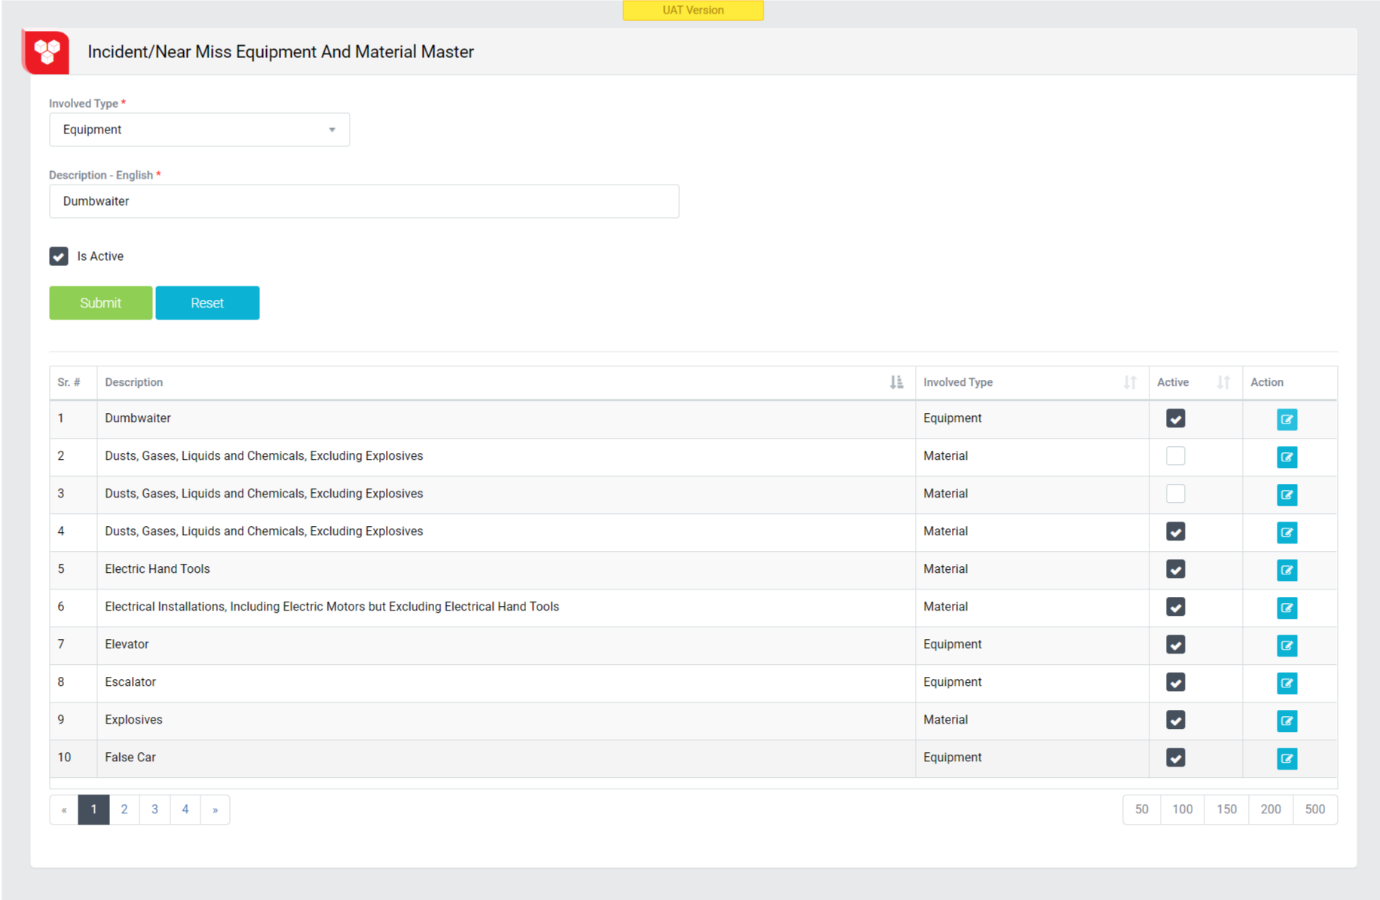
Image 2
- To update/edit existing equipment and material, click on “Edit” button.
- the equipment and material details as per requirement.
- Click Update button to update existing equipment and material.
- Click Clear button to clear the details to facilitate entry of a new equipment and material.
VIEW EXISTING EQUIPMENT AND MATERIAL

Image 3
- Click Description and Involved type on table to view the Description and Involved type in ascending/descending order.
- Equipment and Material can be made Active/In-Active by clicking “Active” button in table.
NATURE OF INJURY MASTER
It allows Administrator to add nature of injury master for Incident/Near-miss modules.
Objective: CREATE NEW NATURE OF INJURY

Image 1
- To configure new Nature of Injury, open Nature of Injury Master screen from configuration/Incident menu.
- Enter Nature of Injury.
- Check/uncheck “Active” check box to make nature of injury active/inactive.
- Click Save button to save the nature of Injury details.
- Click Clear button to clear all the entry fields.
- Newly created nature of injury is displayed once nature of injury is saved.
UPDATE EXISTING NATURE OF INJURY
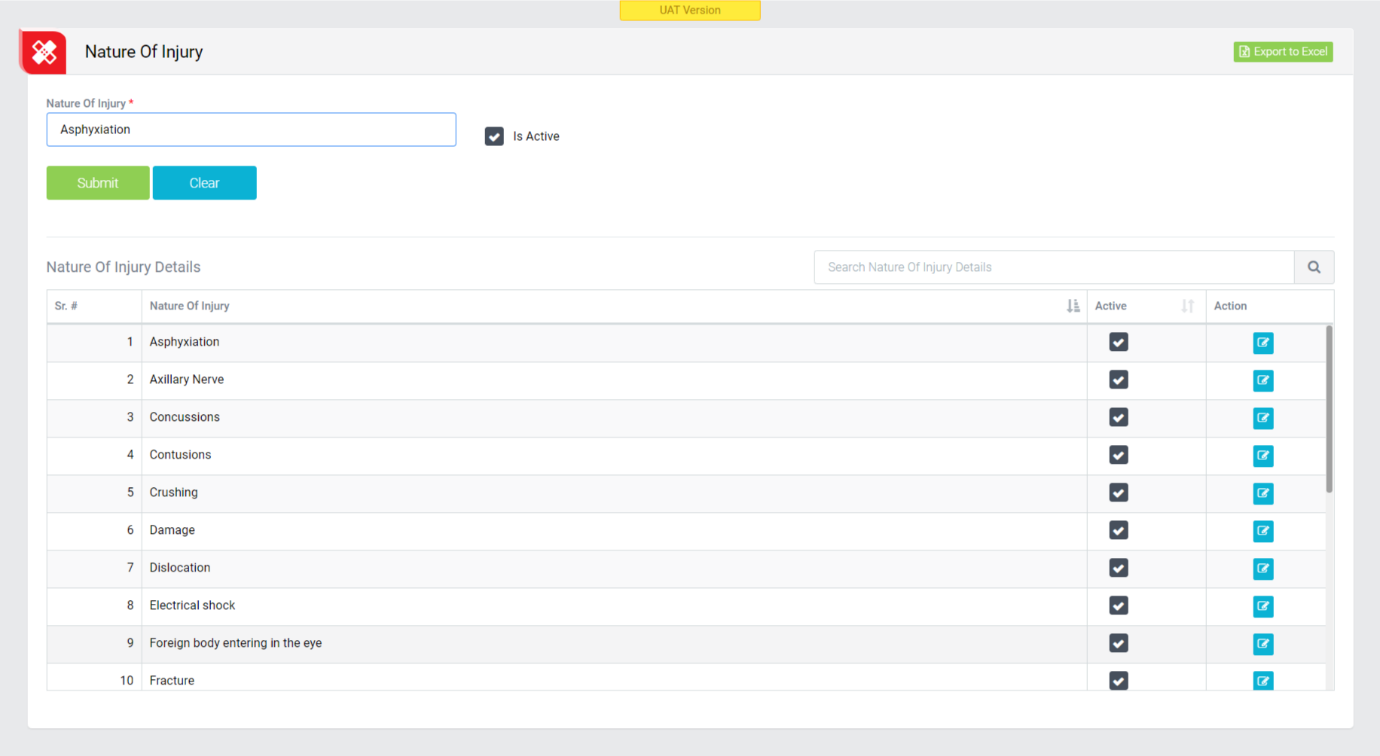
Image 2
- To update/edit existing equipment and material, click on “Edit” button.
- the nature of injury details as per requirement.
- Click Update button to update existing nature of injury.
- Click Clear button to clear the details to facilitate entry of a new nature of injury.
VIEW EXISTING NATURE OF INJURY
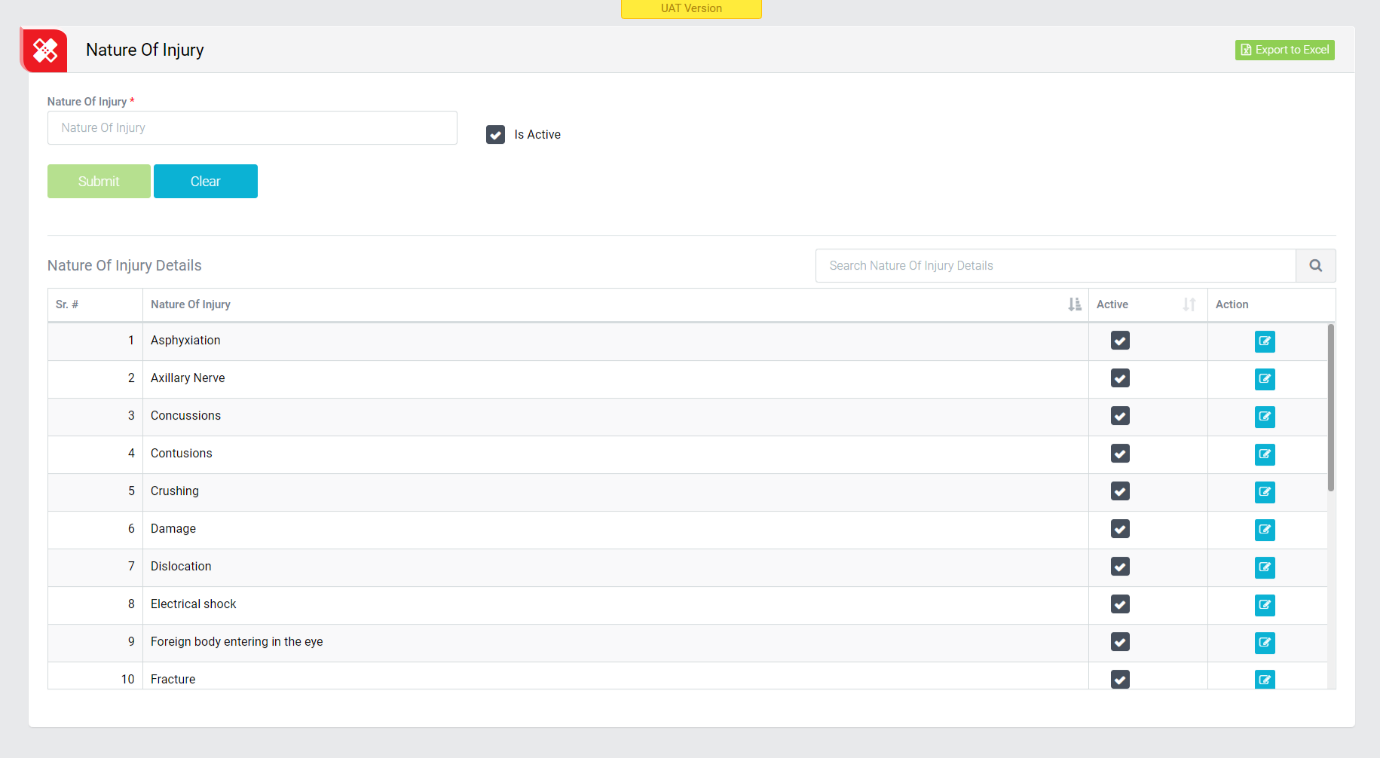
Image 3
- Click Nature of Injury on table to view the Nature of Injury in ascending/descending order.
- Nature of Injury can be made Active/In-Active by clicking “Active” button in table.
BODY PART MASTER
Objective: It allows Administrator to add body part for Incident/Near-miss modules.
CREATE NEW BODY PART
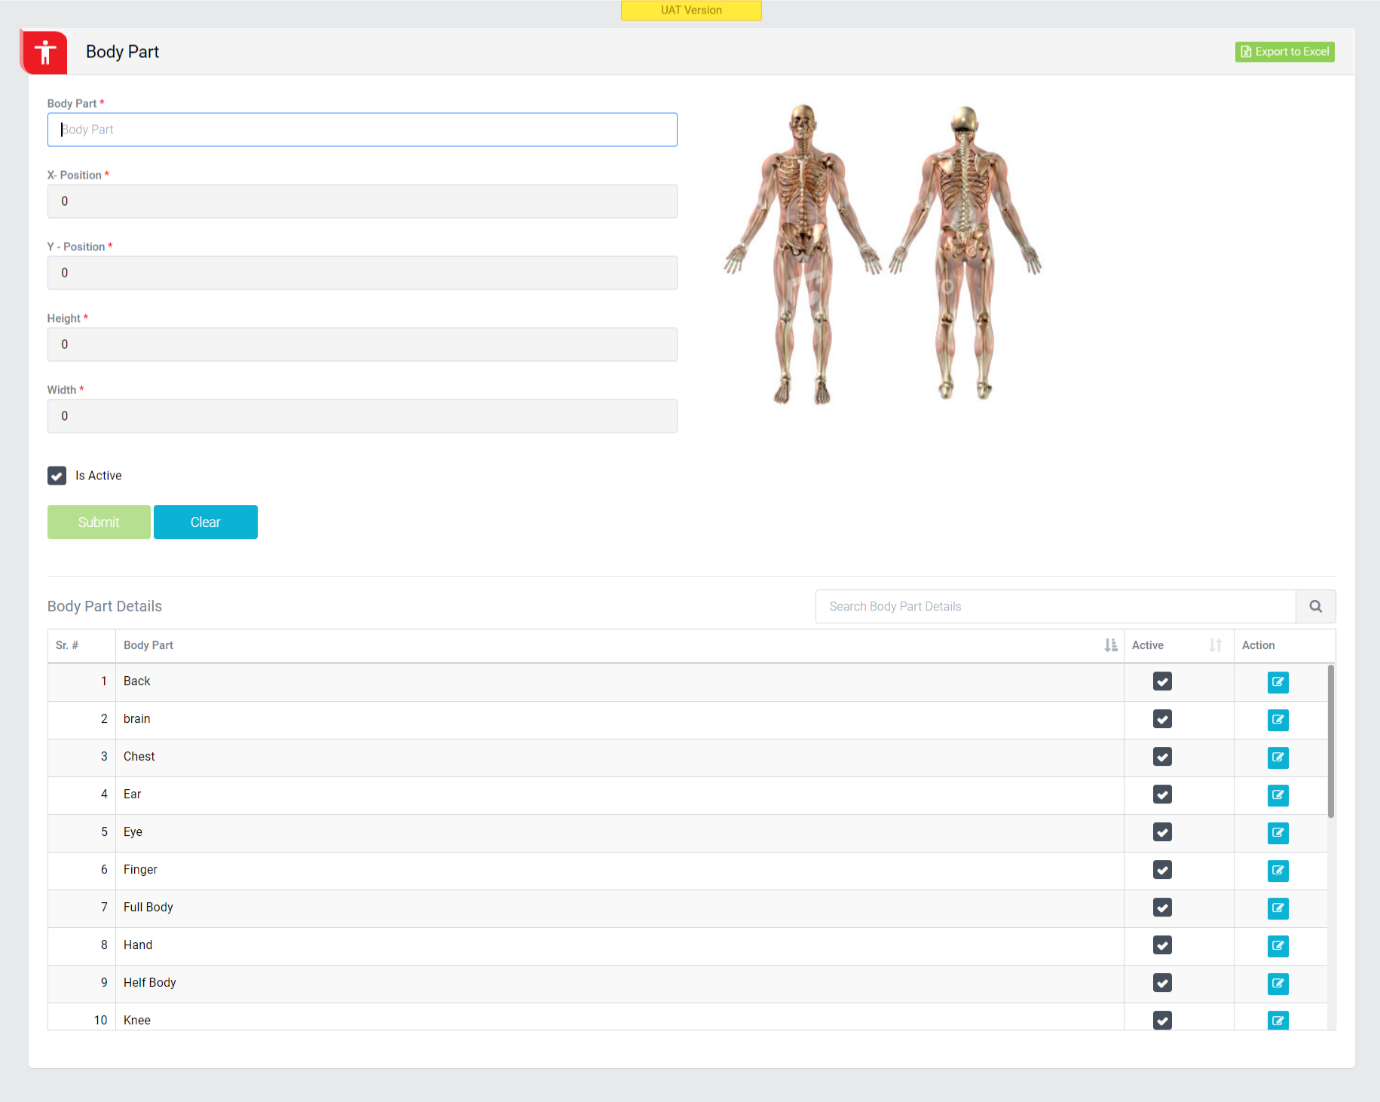
Image 1
- To configure new Body Part, open Body Part Master screen from configuration/Incident menu.
- Enter Body Part.
- Select Area from body figure. X-Position, Y-Position, Height and Width will be bind based on selected area.
- Check/uncheck “Active” check box to make an body part active/inactive.
- Click Save button to save the body part details.
- Click Clear button to clear all the entry fields.
- Newly created body part is displayed once it is saved.
UPDATE EXISTING BODY PART
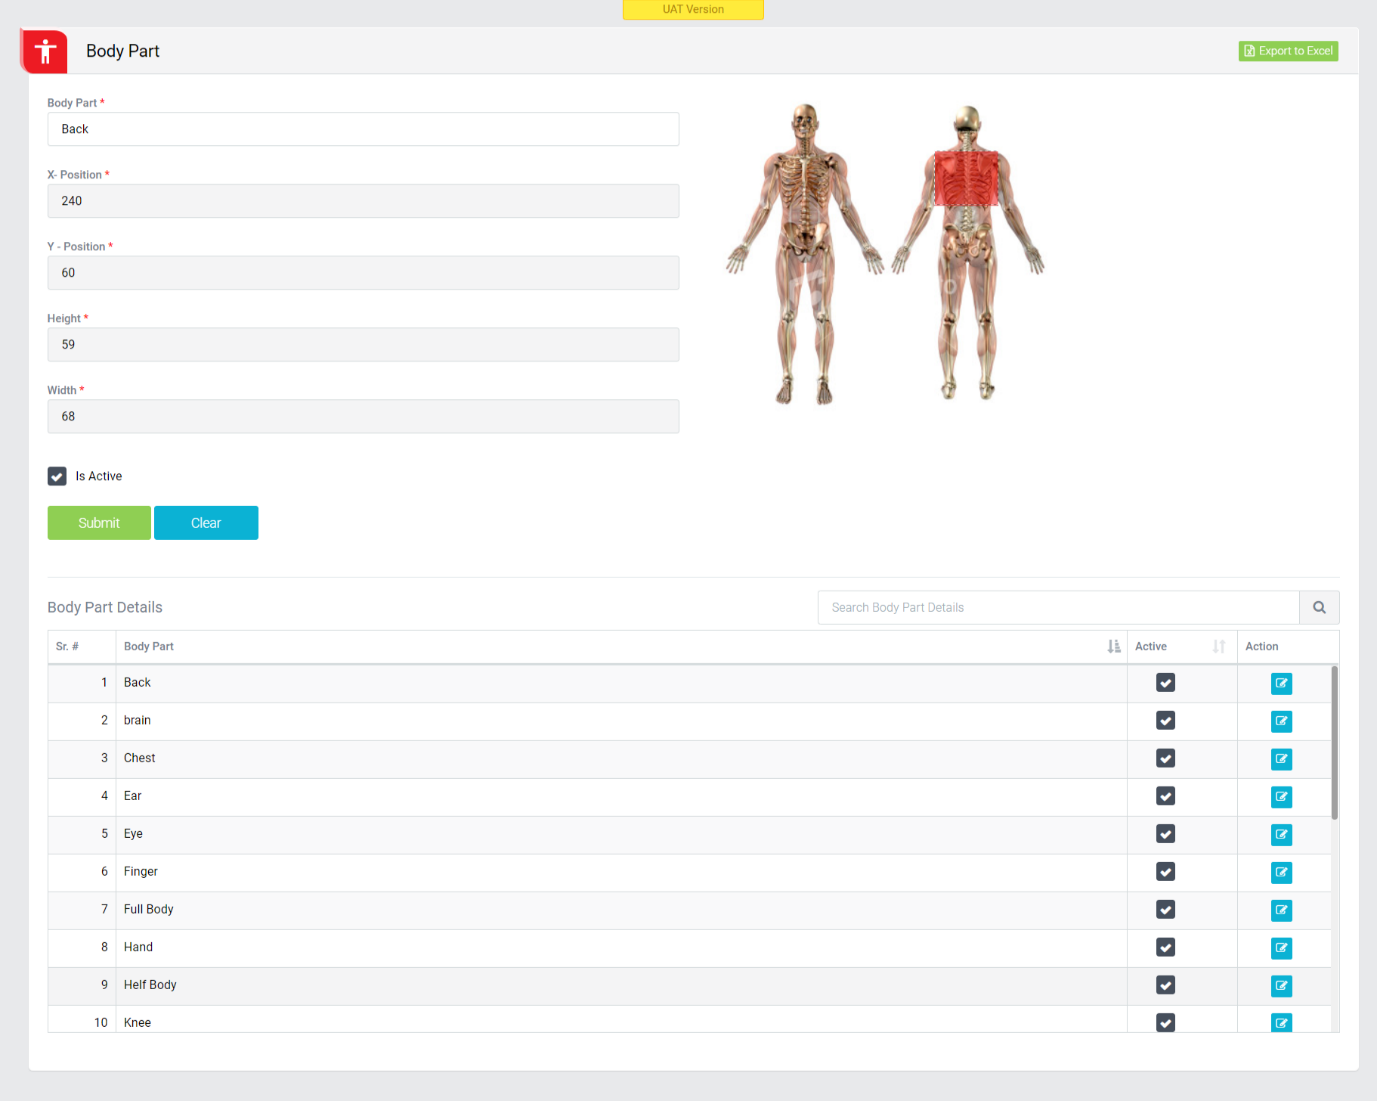
Image 2
- To update/edit existing body Part, click on “Edit” button.
- Change the body part details as per requirement.
- Click Update button to update existing body part.
- Click Clear button to clear the details to facilitate entry of a new body part.
VIEW EXISTING BODY PART

Image 3
- Click Body Part on table to view the Body Part in ascending/descending order.
- Body Part can be made Active/In-Active by clicking “Active” button in table.
INCIDENT/NEAR MISS COST MASTER
Objective: It allows Administrator to add cost for Incident/Near-miss modules.
CREATE NEW INCIDENT/NEAR MISS COST
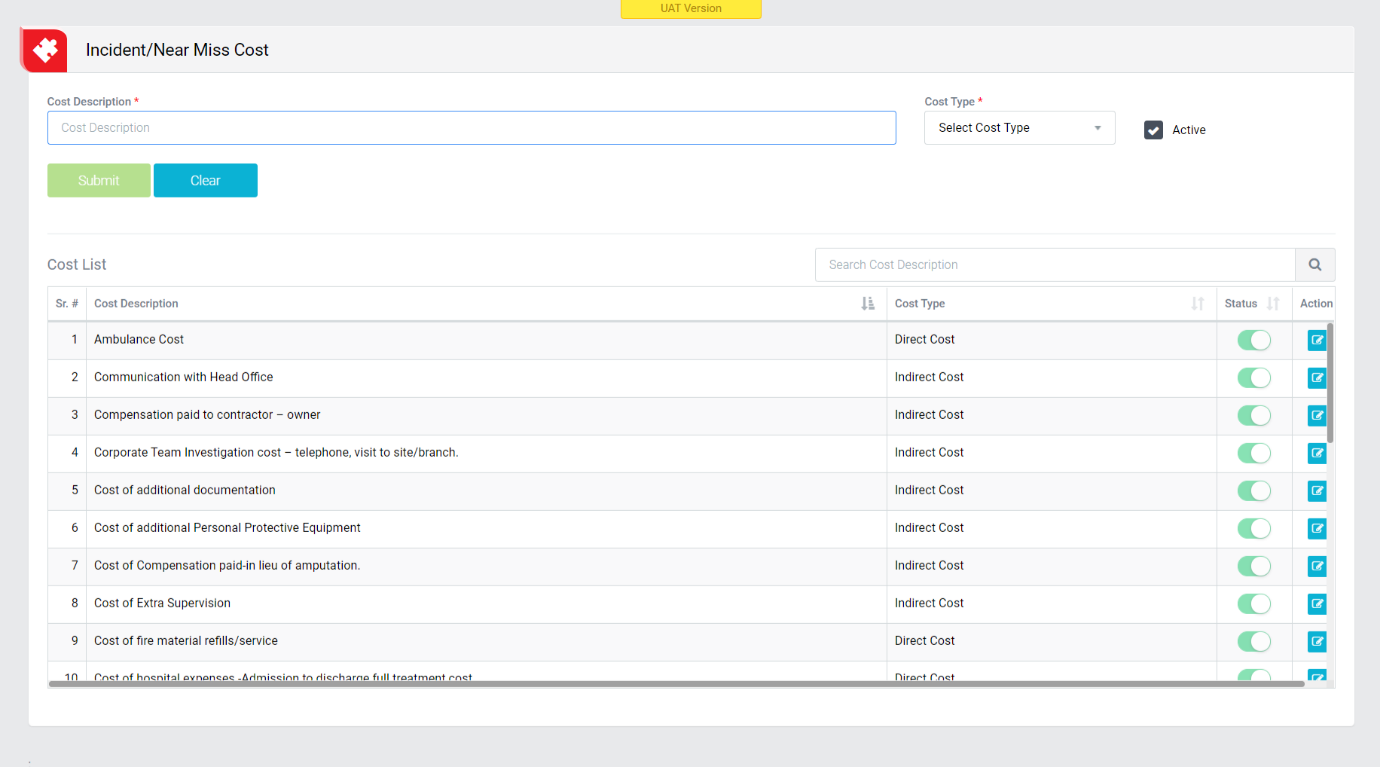
Image 1
- To configure new Cost, open Incident/Near miss Cost Master screen from configuration/Incident menu.
- Enter Cost Description.
- Select Cost Type from drop down.
- Check/uncheck “Active” check box to make cost active/inactive.
- Click Save button to save the cost details.
- Click Clear button to clear all the entry fields.
- Newly created cost is displayed once it is saved.
UPDATE EXISTING COST
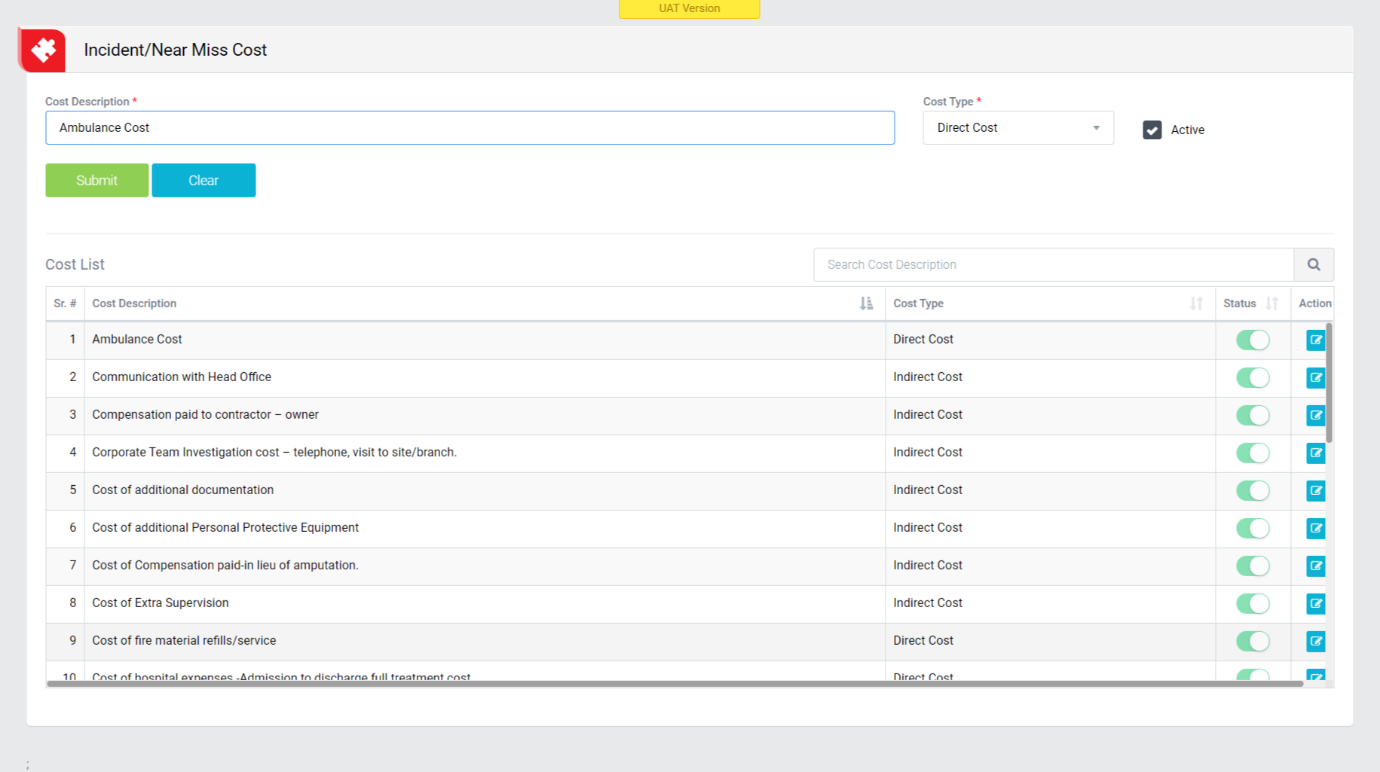
Image 2
- To update/edit existing Cost, click on “Edit” button.
- Change the cost details as per requirement.
- Click Update button to update existing cost.
- Click Clear button to clear the details to facilitate entry of a new cost.
VIEW EXISTING COST

Image 3
- Click Cost Description and Cost Type on table to view the Cost Description and Cost Type in ascending/descending order.
- Cost can be made Active/In-Active by clicking “Active” button in table.
HAZARD TYPE MASTER
Objective: It allows Administrator to add hazard for Incident/Near-miss modules.
CREATE NEW HAZARD

Image 1
- To configure new hazard, open Incident/Near miss Hazard Type Master screen from configuration/Incident menu.
- Enter Hazard.
- Check/uncheck “Active” check box to make hazard active/inactive.
- Click Save button to save the hazard details.
- Click Clear button to clear all the entry fields.
- Newly created hazard is displayed once it is saved.
UPDATE EXISTING HAZARD
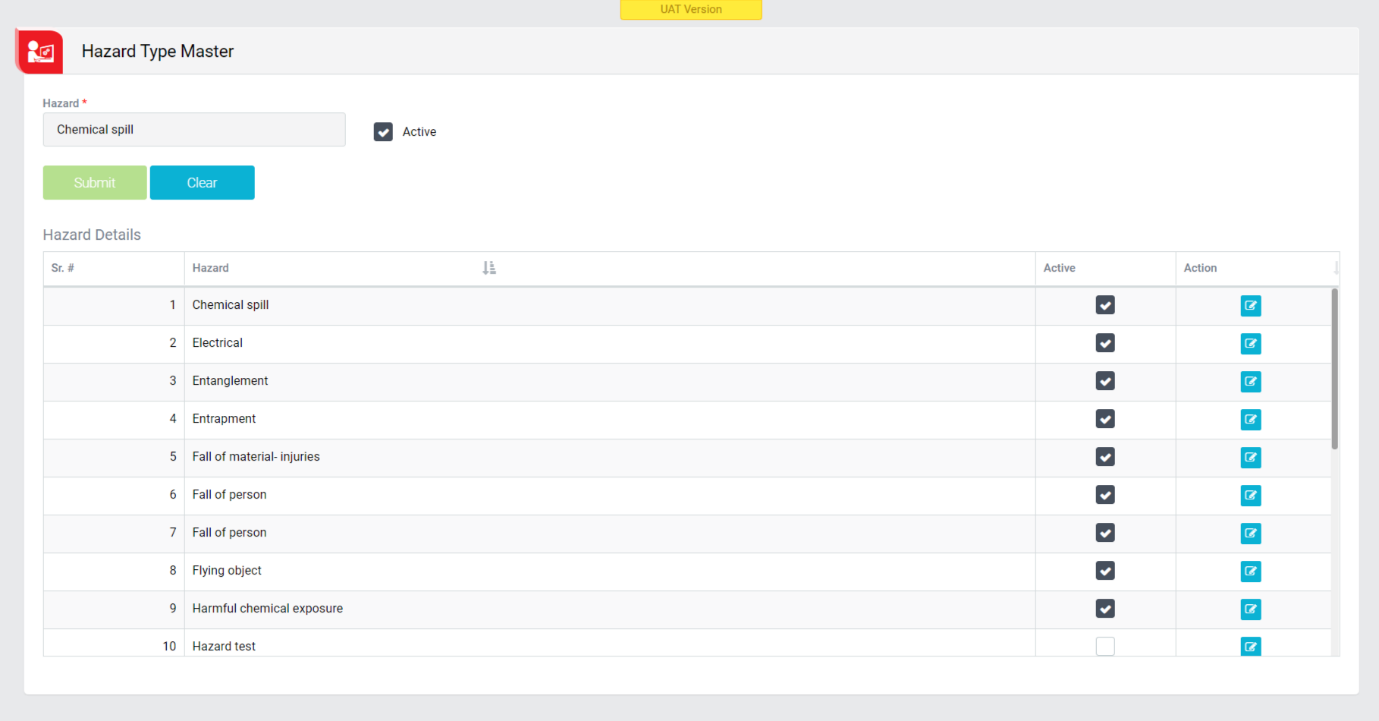
Image 2
- To update/edit existing Hazard, click on “Edit” button.
- Change the hazard details as per requirement.
- Click Update button to update existing hazard.
- Click Clear button to clear the details to facilitate entry of a new hazard.
VIEW EXISTING HAZARD
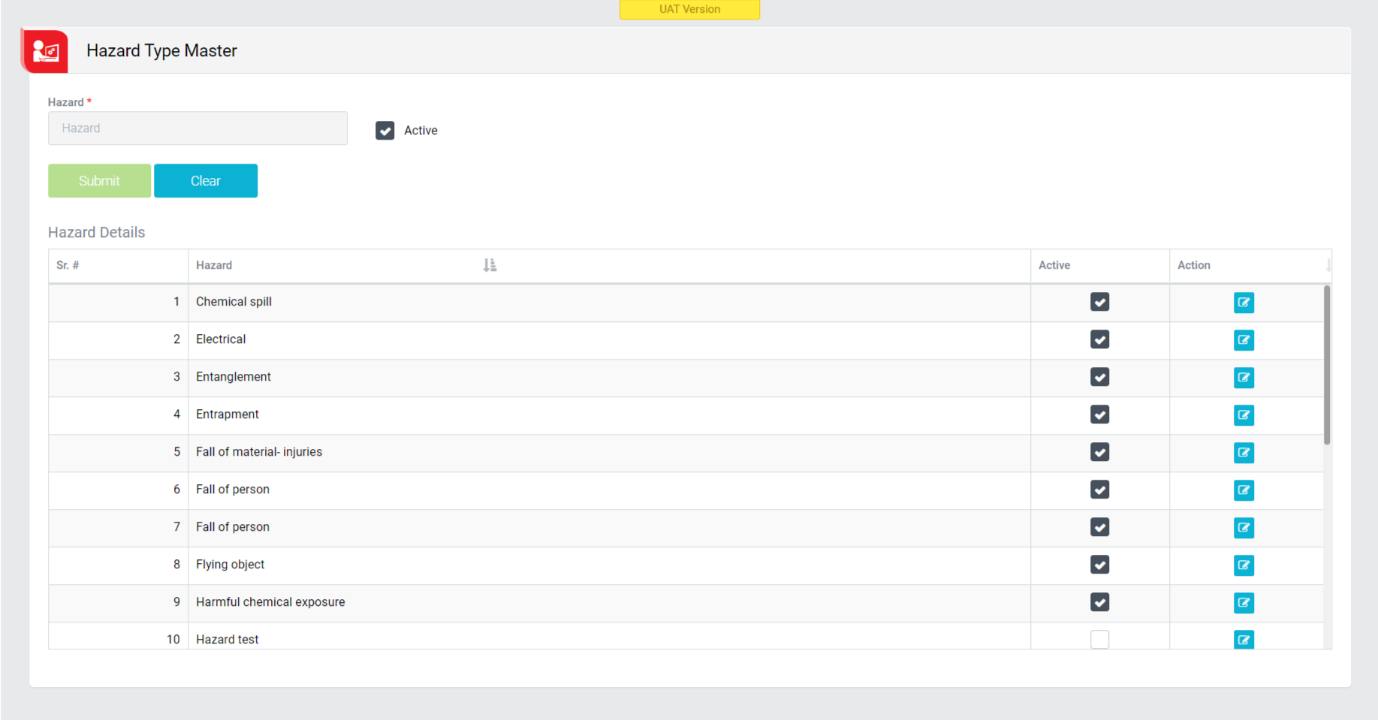
Image 3
- Click Hazard on table to view the Hazard in ascending/descending order.
- Hazard can be made Active/In-Active by clicking “Active” button in table.
ACTIVITY STATUS
Objective: It allows Administrator to add activity status for Incident/Near-miss modules.
CREATE NEW ACTIVITY STATUS
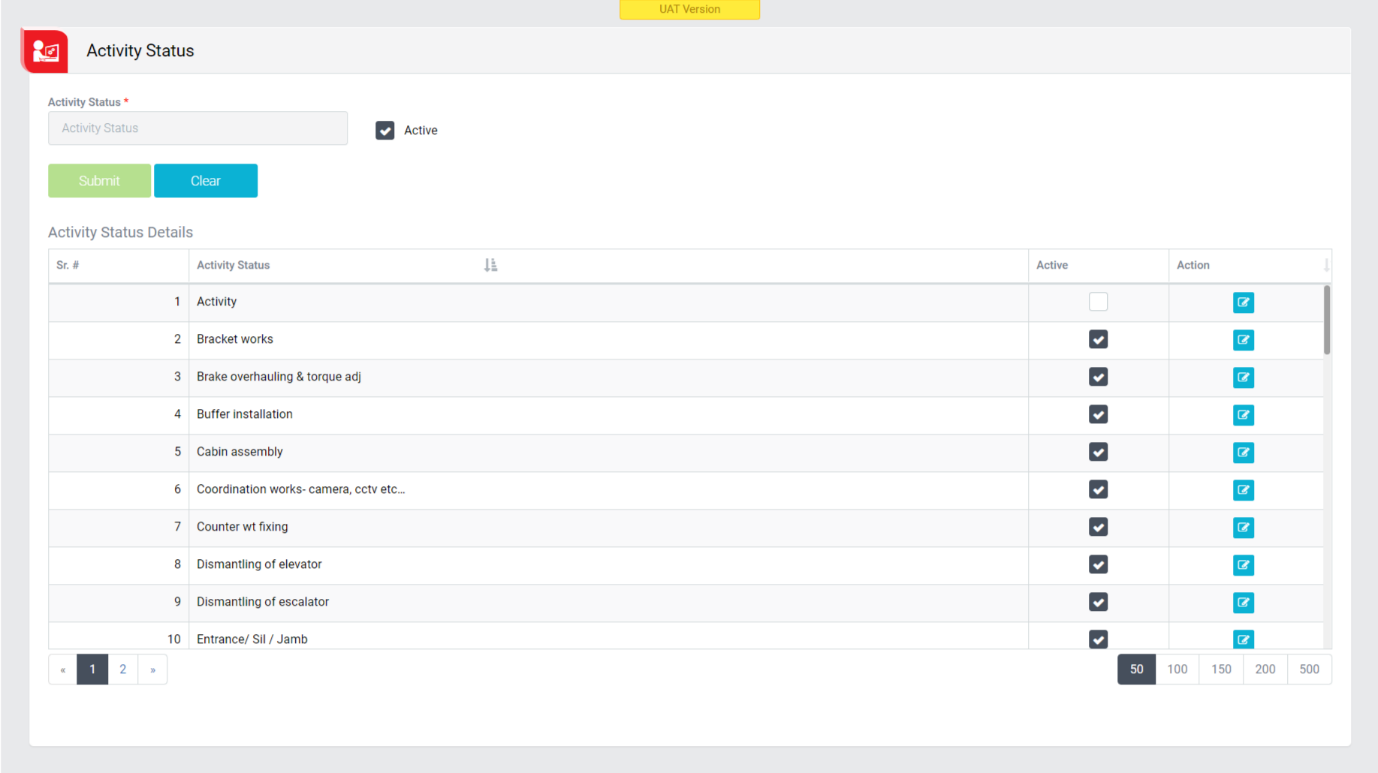
Image 1
- To configure new activity status, open Incident/Near miss Activity Status screen from configuration/Incident menu.
- Enter Activity Status.
- Check/uncheck “Active” check box to make activity status active/inactive.
- Click Save button to save the activity status details.
- Click Clear button to clear all the entry fields.
- Newly created activity status is displayed once it is saved.
UPDATE EXISTING ACTIVITY STATUS
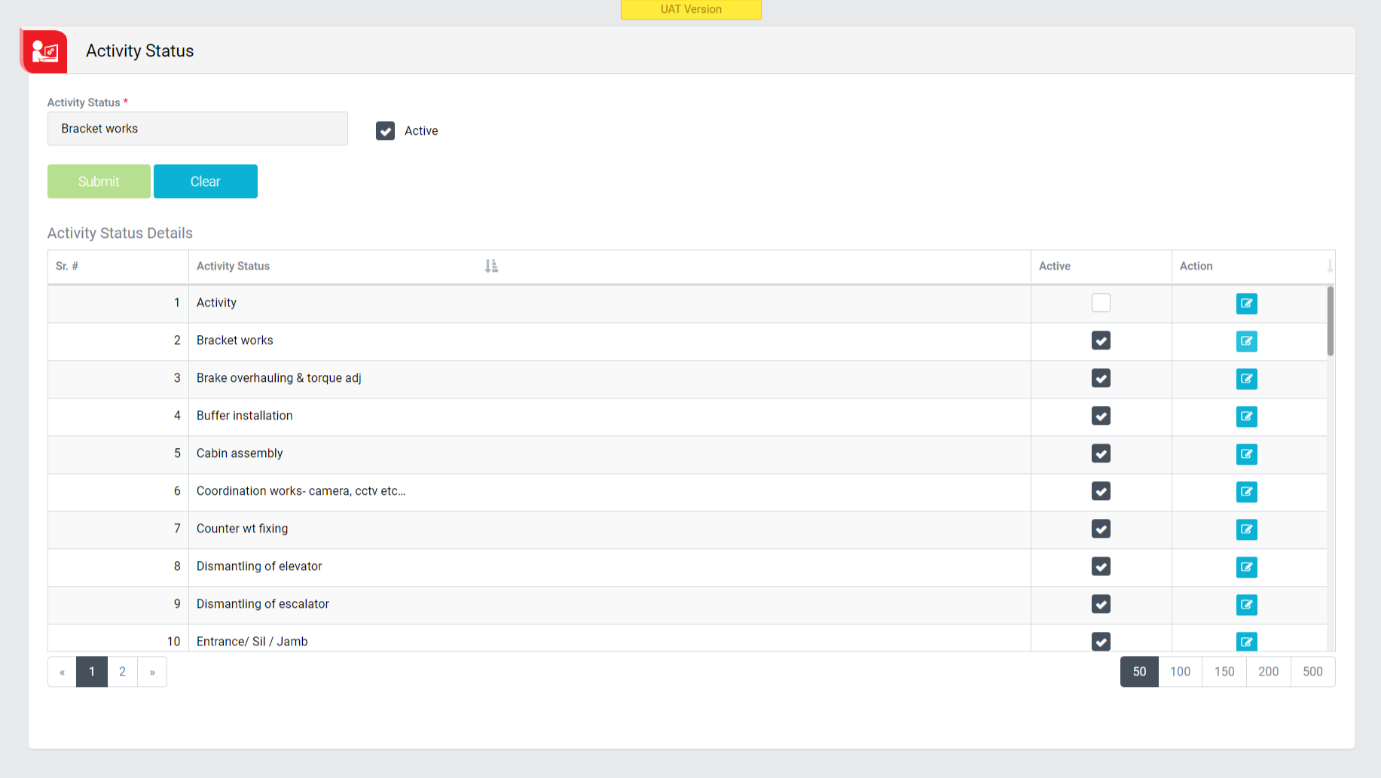
Image 2
- To update/edit existing Activity Status, click on “Edit” button.
- Change the activity status details as per requirement.
- Click Update button to update existing activity status.
- Click Clear button to clear the details to facilitate entry of a new activity status.
VIEW EXISTING ACTIVITY STATUS

Image 3
- Click Activity Status on table to view the Activity Status in ascending/descending order.
- Activity Status can be made Active/In-Active by clicking “Active” button in table.
SAFETY PATROL CHECKLIST
Objective: It allows Administrator to add checklist for Safety Patrol modules.
CREATE NEW SAFETY PATROL
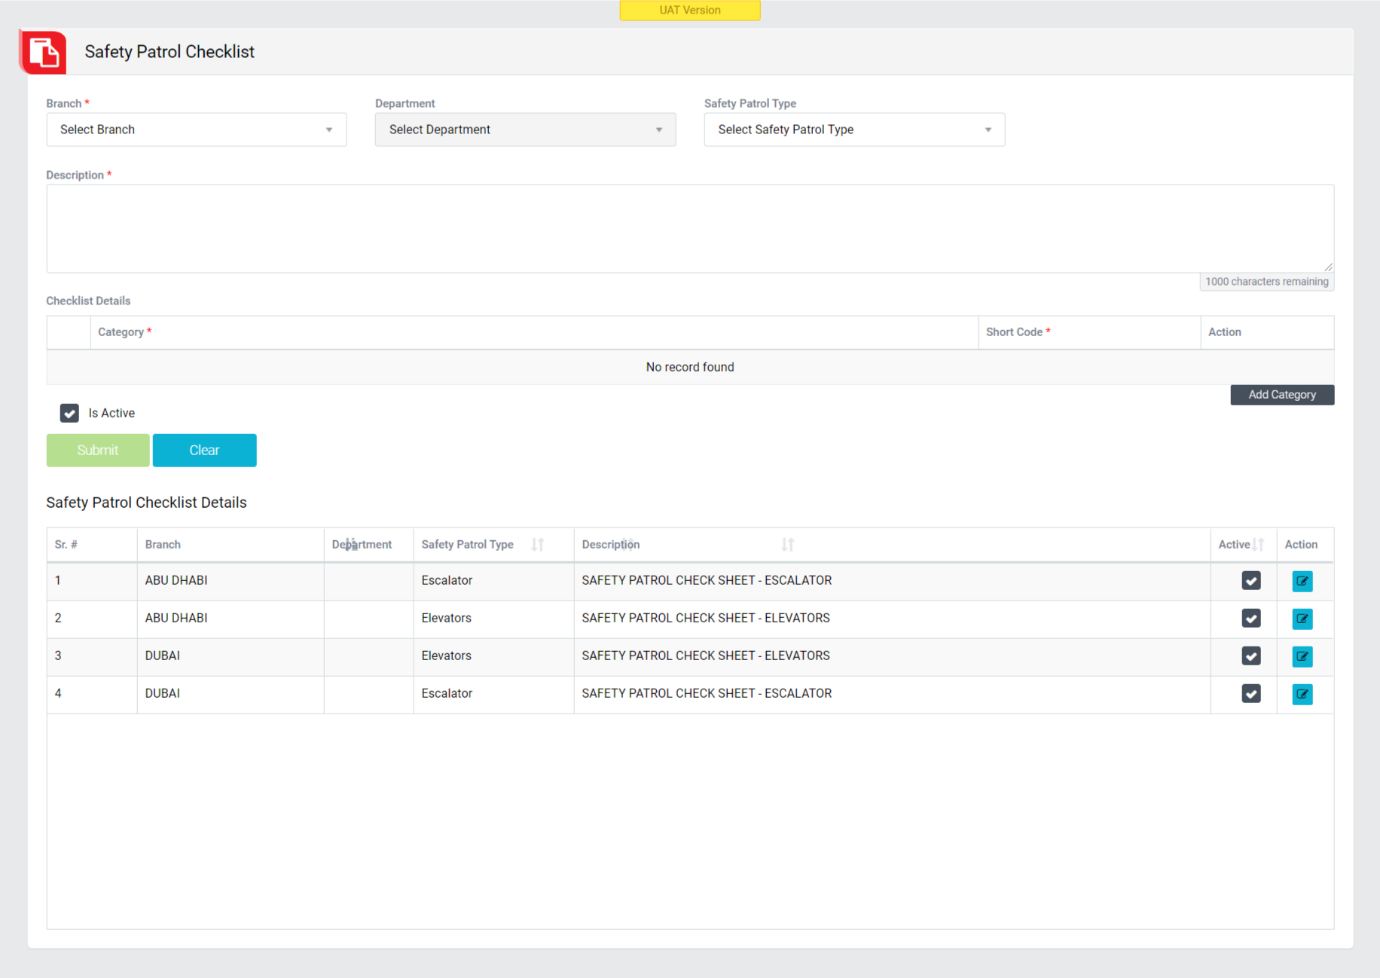
Image 1
- To configure new checklist, open Safety Patrol Checklist screen from configuration/Safety Patrol menu.
- Select Branch, Department and Safety Patrol Type from drop down.
- Enter Description.
- Click on “Add Category” to add checklist details.
- Enter Category and Short Code in checklist detail.
- Check/uncheck “Active” check box to make checklist active/inactive.
- Click Save button to save the checklist details.
- Click Clear button to clear all the entry fields.
- Newly created checklist is displayed once it is saved.
UPDATE EXISTING SAFETY PATROL CHECKLIST
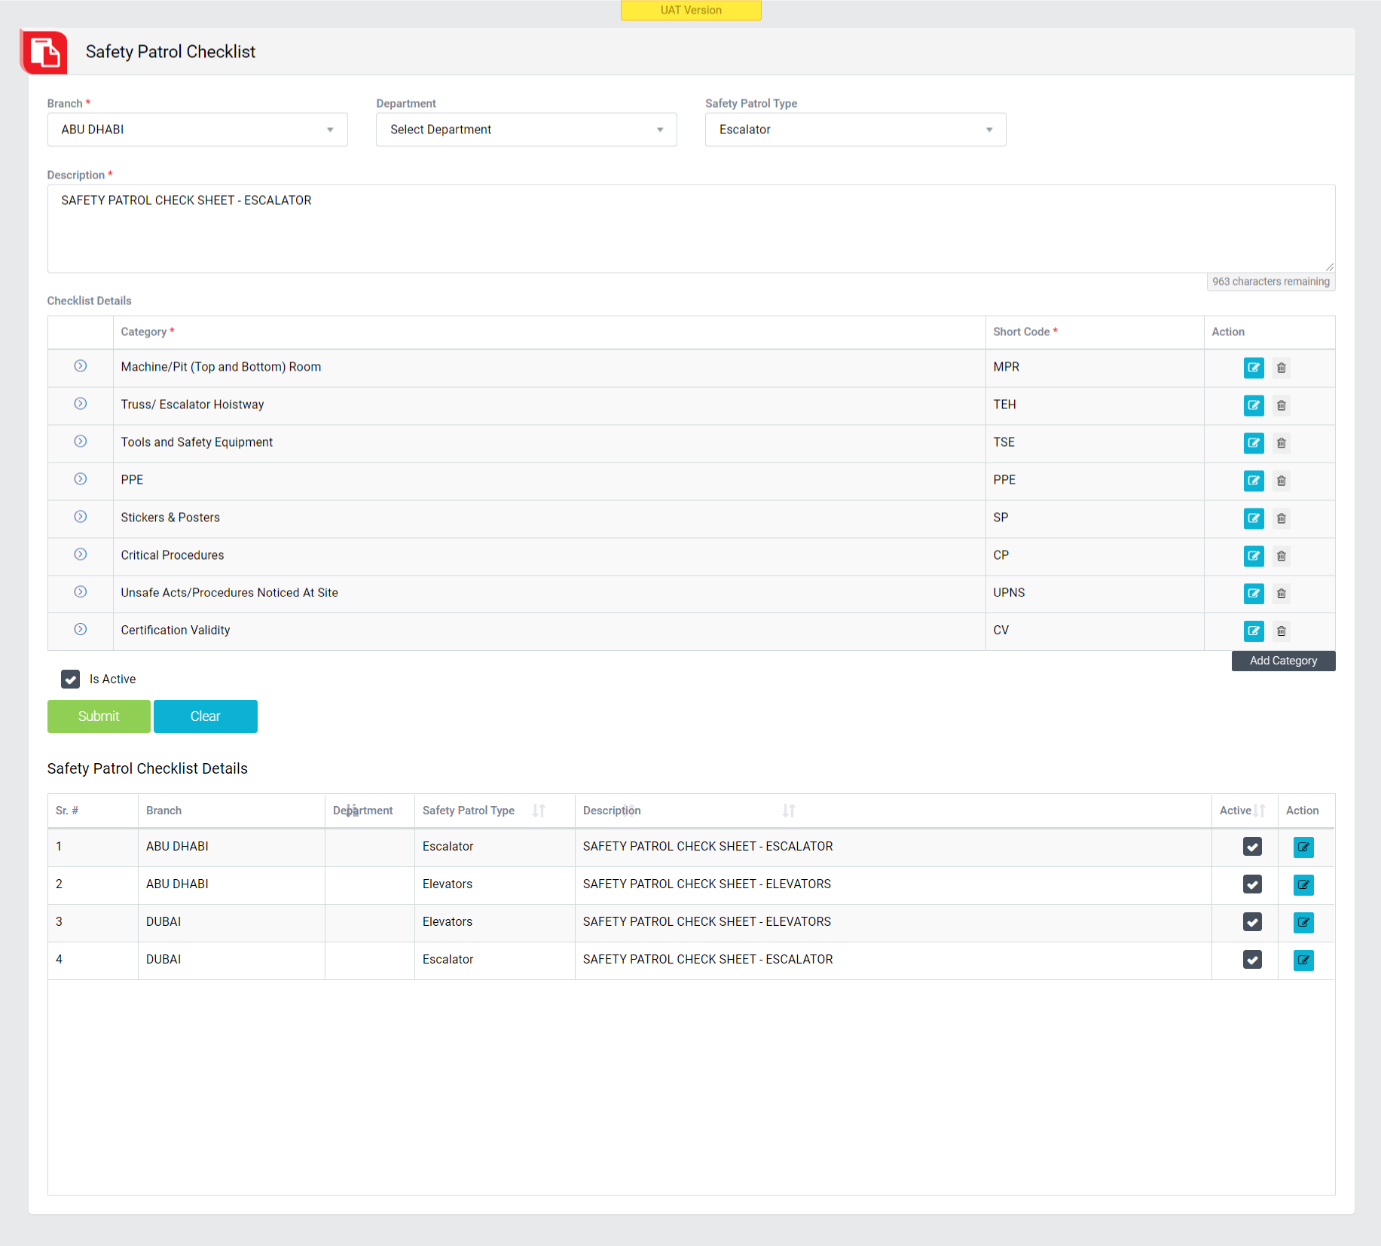
Image 2
- To update/edit existing checklist, click on “Edit” button.
- Change the checklist details as per requirement.
- Click Update button to update existing checklist.
- Click Clear button to clear the details to facilitate entry of a new checklist.
VIEW EXISTING SAFETY PATROL CHECKLIST

Image 3
- Click Branch, Department, Safety Patrol Type, Description on table to view the Branch, Department, Safety Patrol Type, Description in ascending/descending order.
- Checklist can be made Active/In-Active by clicking “Active” button in table.
MANAGEMENT SAFETY PATROL CHECKLIST
Objective: It allows Administrator to add checklist for Management Safety Patrol modules.
CREATE NEW MANAGEMENT SAFETY PATROL

Image 1
- To configure new checklist, open Management Safety Patrol Checklist screen from configuration/Safety Patrol menu.
- Select Branch from drop down.
- Enter Description.
- Click on “Add Category” to add checklist details.
- Enter Category and Short Code in checklist detail.
- Check/uncheck “Active” check box to make checklist active/inactive.
- Click Save button to save the checklist details.
- Click Clear button to clear all the entry fields.
- Newly created checklist is displayed once it is saved.
UPDATE EXISTING MANAGEMENT SAFETY PATROL CHECKLIST
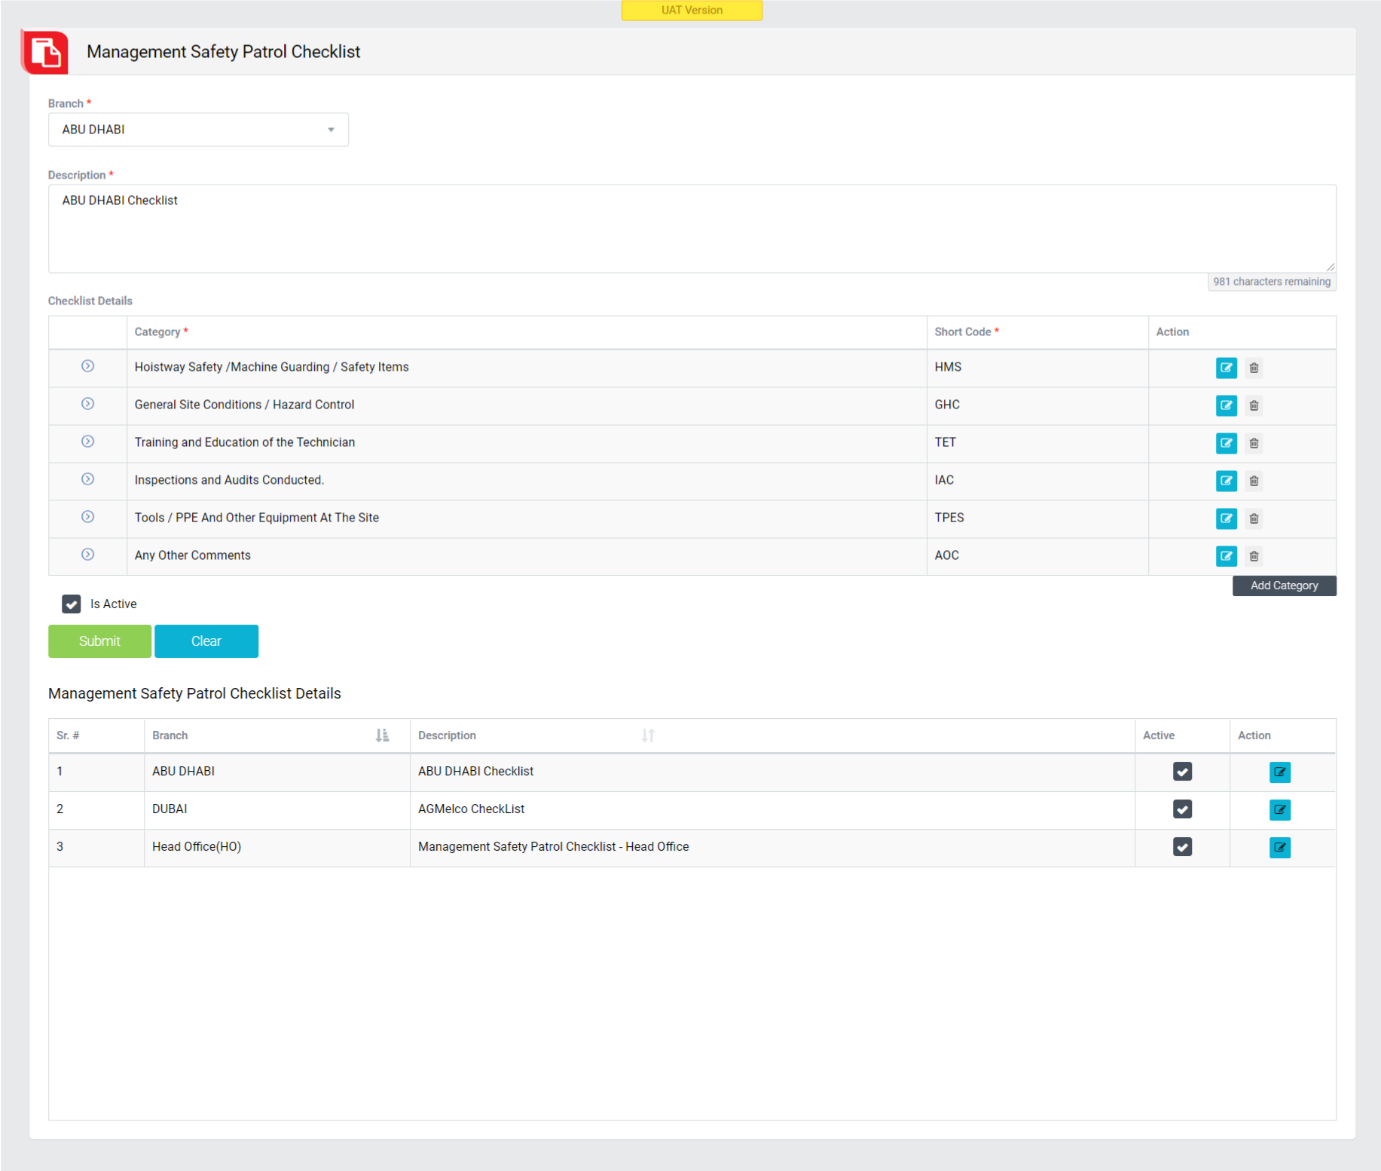
Image 2
- To update/edit existing checklist, click on “Edit” button.
- Change the checklist details as per requirement.
- Click Update button to update existing checklist.
- Click Clear button to clear the details to facilitate entry of a new checklist.
VIEW EXISTING MANAGEMENT SAFETY PATROL CHECKLIST
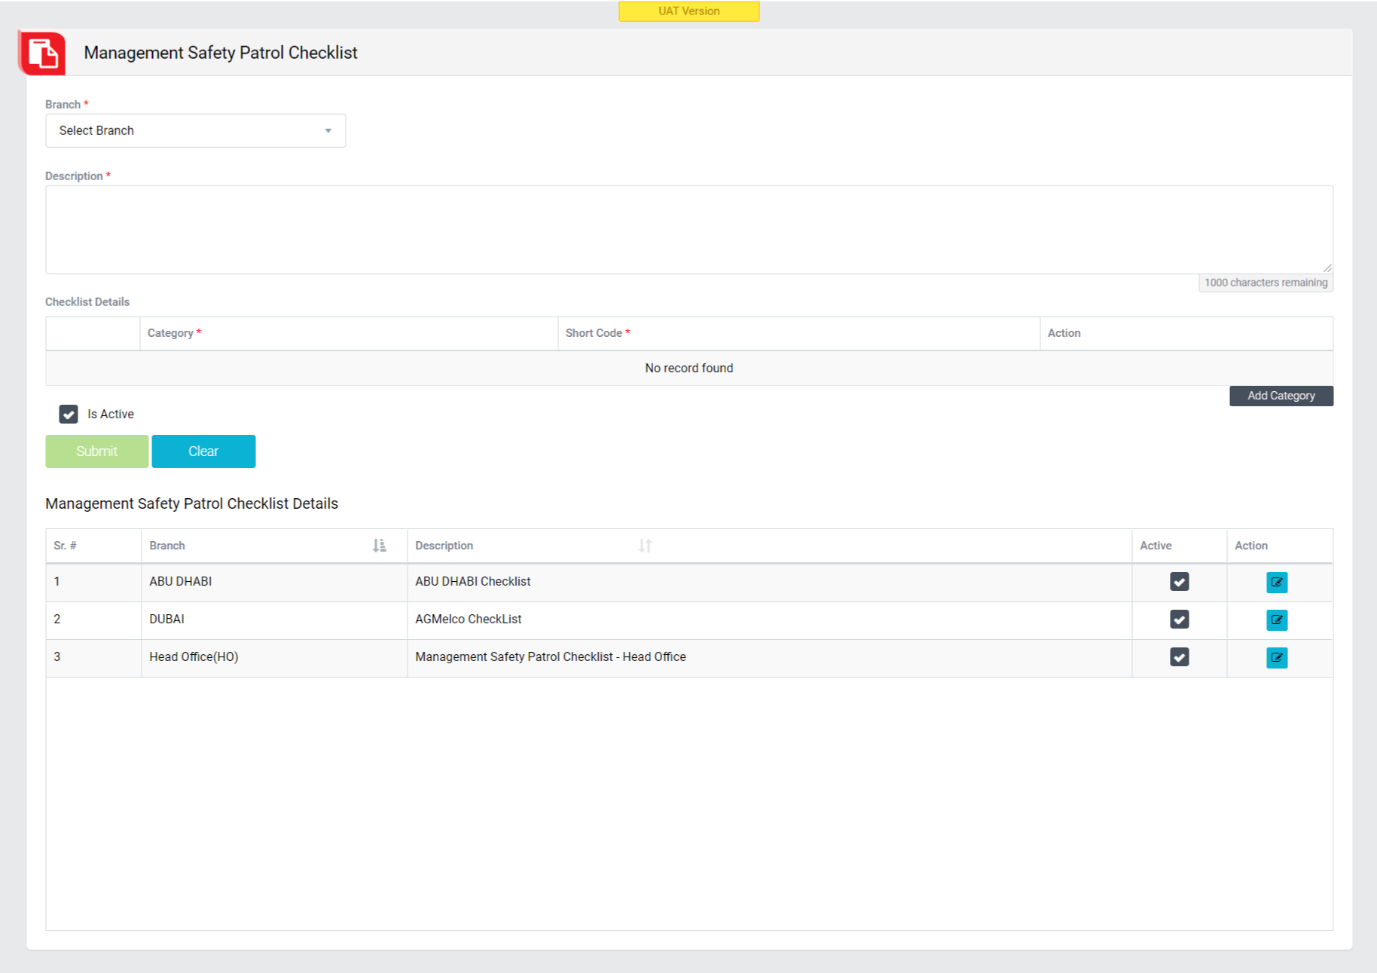
Image 3
- Click Branch, Description on table to view the Branch, Description in ascending/descending order.
- Checklist can be made Active/In-Active by clicking “Active” button in table.
HSE OBSERVATION CATGORY MASTER
Objective: It allows Administrator to add category for HSE Observation module.
CREATE NEW OBSERVATION CATEGORY

Image 1
- To configure new Category, open HSE Observation Category Master from configuration/HSE Observation menu.
- Enter Observation Category.
- Check/uncheck “Active” check box to make a category active/inactive.
- Click Save button to save the category details.
- Click Clear button to clear all the entry fields.
- Newly created category is displayed once category is saved.
UPDATE EXISTING HSE OBSERVATION CATEGORY
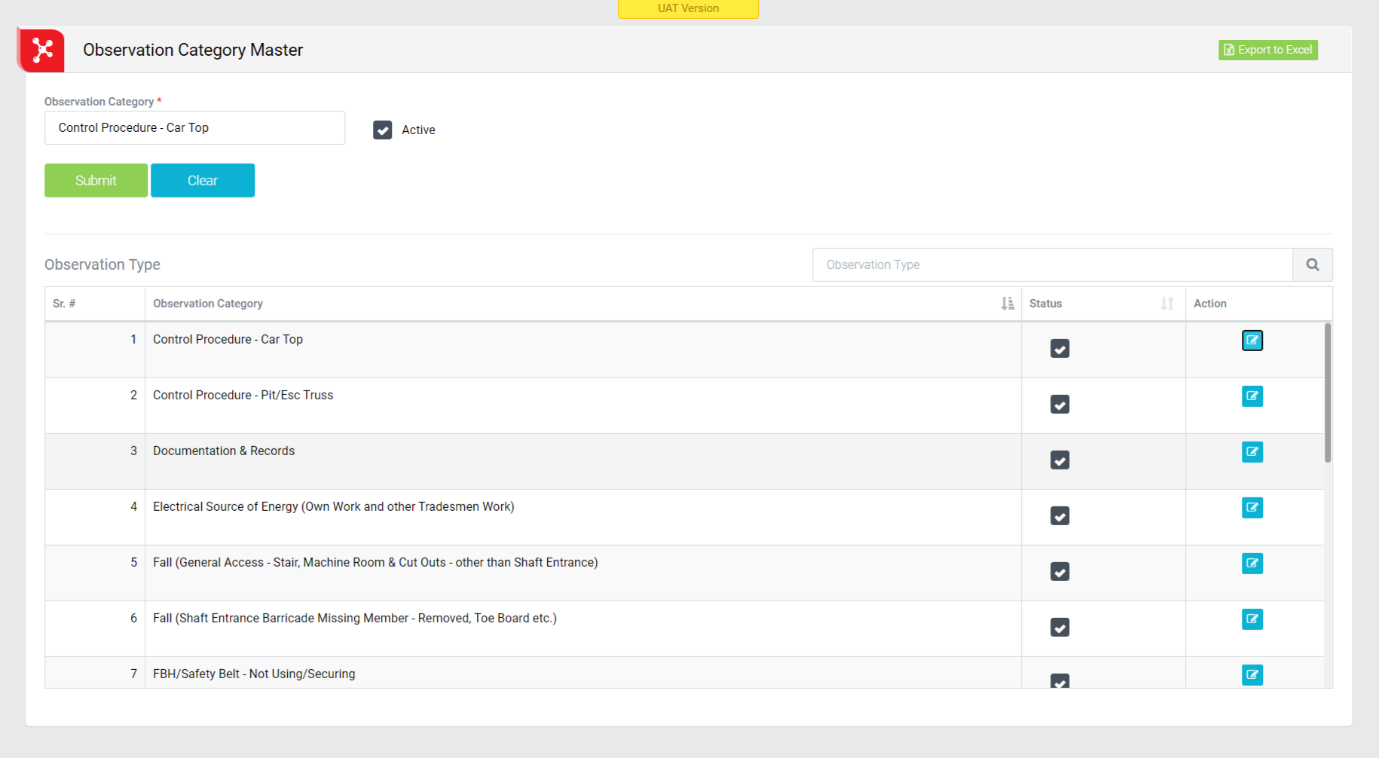
Image 2
- To update/edit existing category, click on “Edit” button.
- Change the category details as per requirement.
- Click Update button to update existing category.
- Click Clear button to clear the details to facilitate entry of a new category.
VIEW EXISTING HSE OBSERVATION CATEGORY
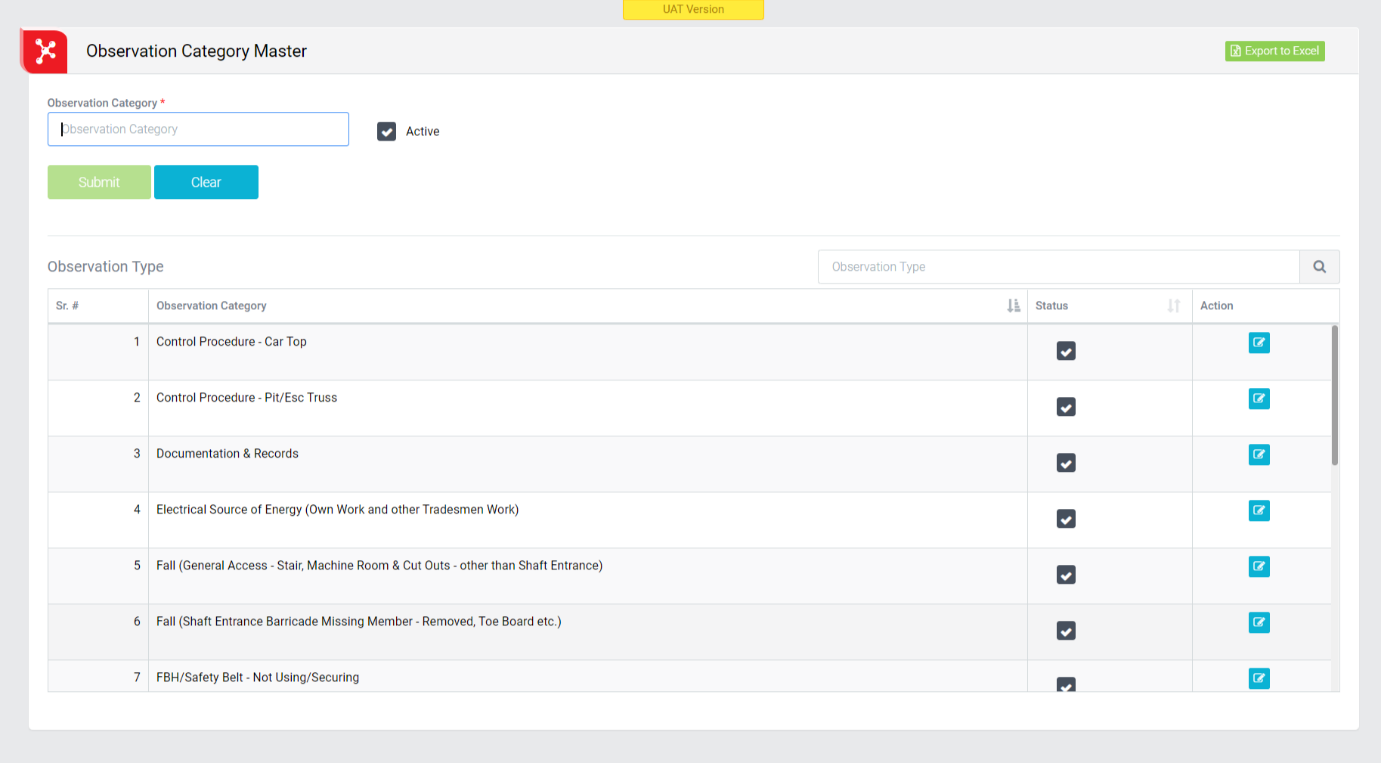
Image 3
- Click Observation Category header on table to view the Observation Category in ascending/descending order.
- HSE Observation category can be made Active/In-Active by clicking “Active” button in table.
SHIFT MASTER
Objective: It allows Administrator to add shift. Update/view existing shift in the system.
CREATE NEW SHIFT MASTER

Image 1
- To configure new shift, open Shift Master screen from configuration menu.
- Enter Shift Name.
- Enter Start Time and End Time from Time.
- Check/uncheck “Active” check box to make shift active/inactive.
- Click Save button to save the shift details.
- Click Clear button to clear all the entry fields.
- Newly created shift is displayed once shift is saved.
UPDATE EXISTING SHIFT
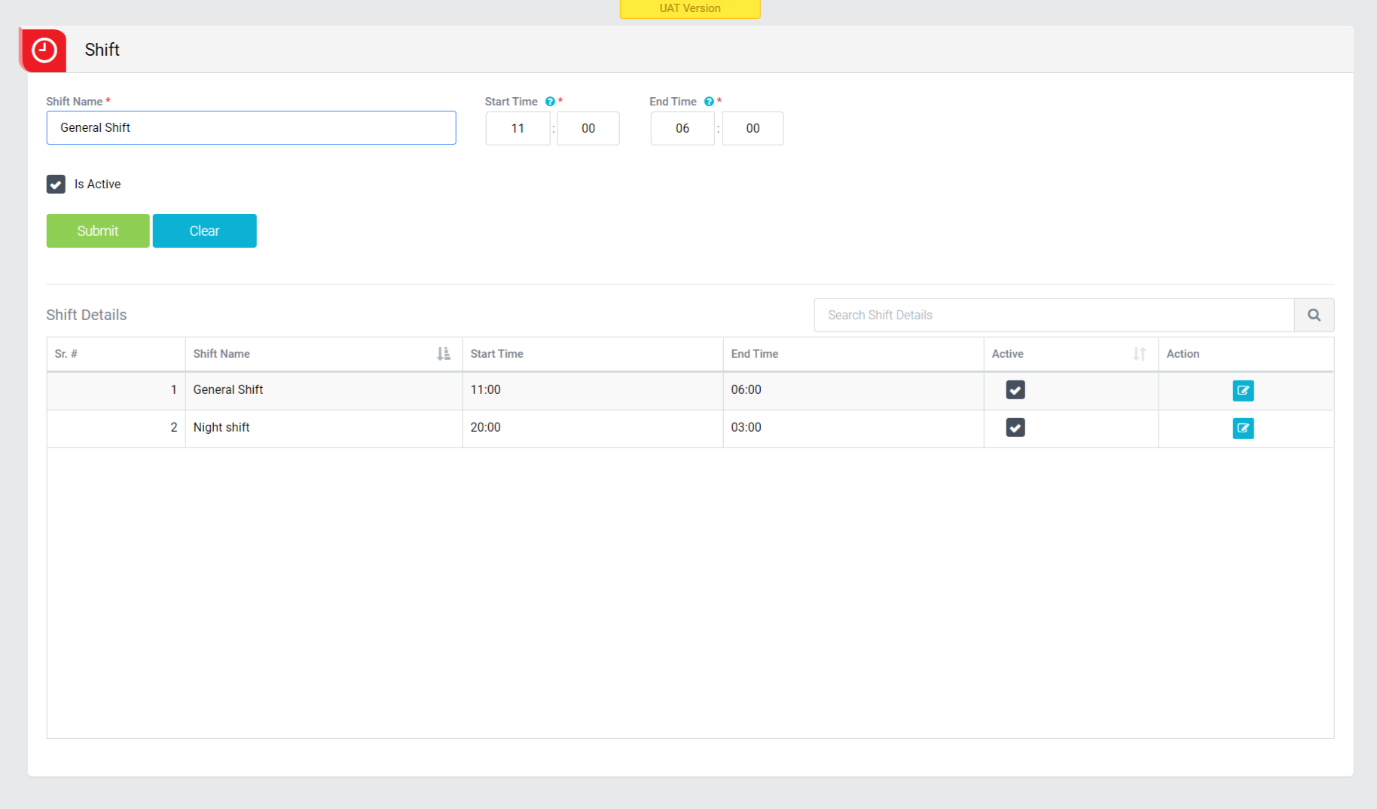
Image 2
- To update/edit existing shift, click on “Edit” button.
- Change the shift details as per requirement.
- Click Update button to update existing shift.
- Click Clear button to clear the details to facilitate entry of a new shift.
VIEW EXISTING SHIFT
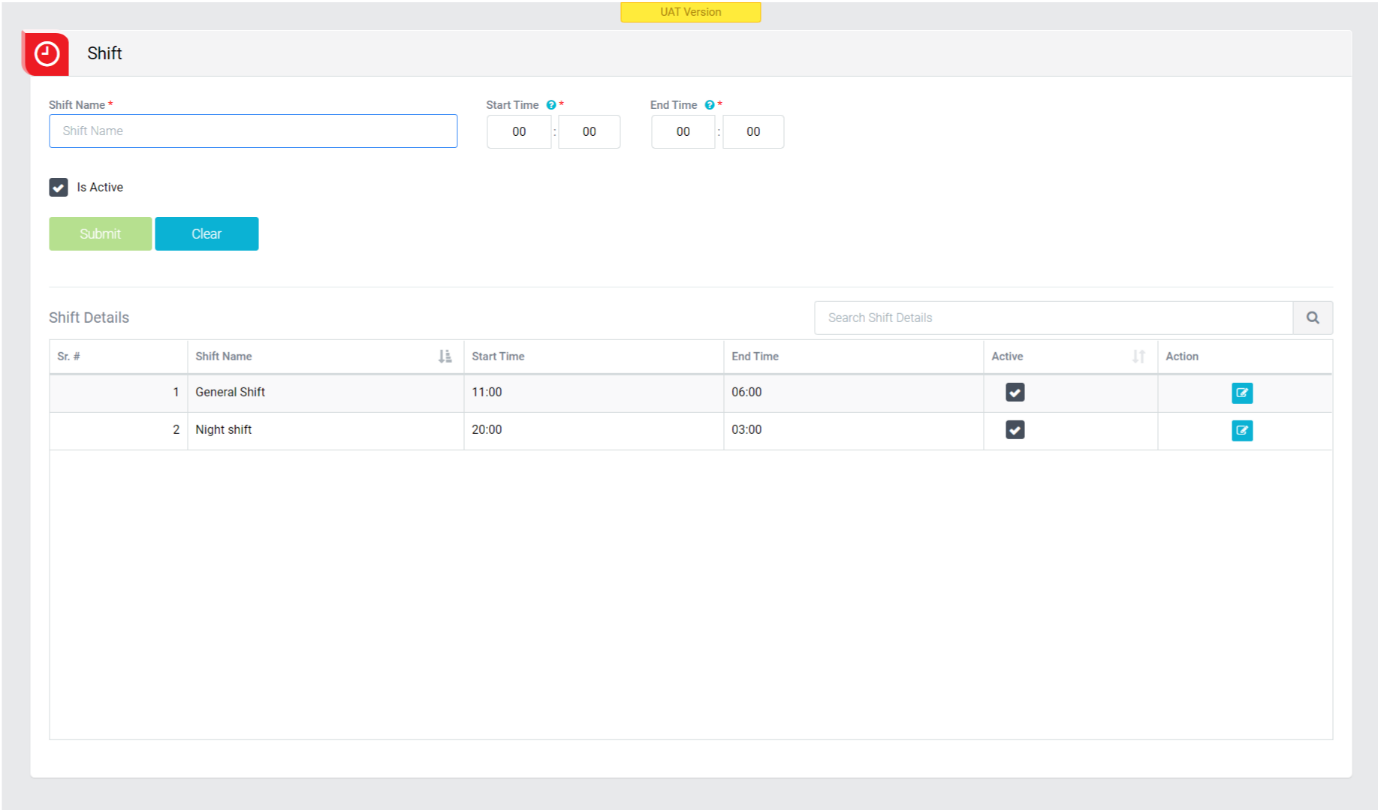
Image 3
- Click Shift Name header on table to view the Shift Name in ascending/descending order.
- Shift Name can be made Active/In-Active by clicking “Active” button in table.
EQUIPMENT TYPE MASTER
Objective: It allows Administrator to add equipment type. Update/view existing equipment type in the system.
CREATE NEW EQUIPMENT TYPE
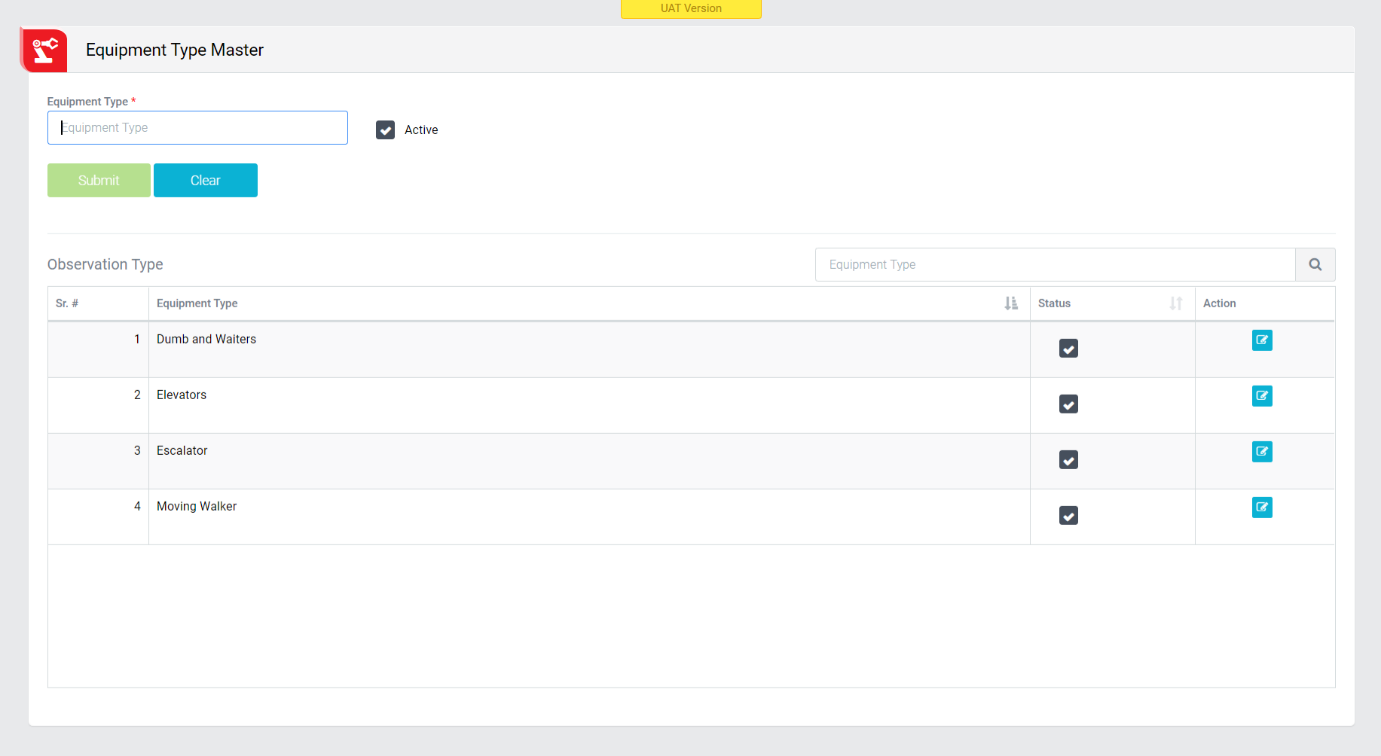
Image 1
- To configure new Equipment type, open Equipment Type Master screen from configuration menu.
- Enter Equipment Type.
- Check/uncheck “Active” check box to make a equipment type active/inactive.
- Click Save button to save the equipment type details.
- Click Clear button to clear all the entry fields.
- Newly created equipment type is displayed once equipment type is saved.
UPDATE EXISTING EQUIPMENT TYPE
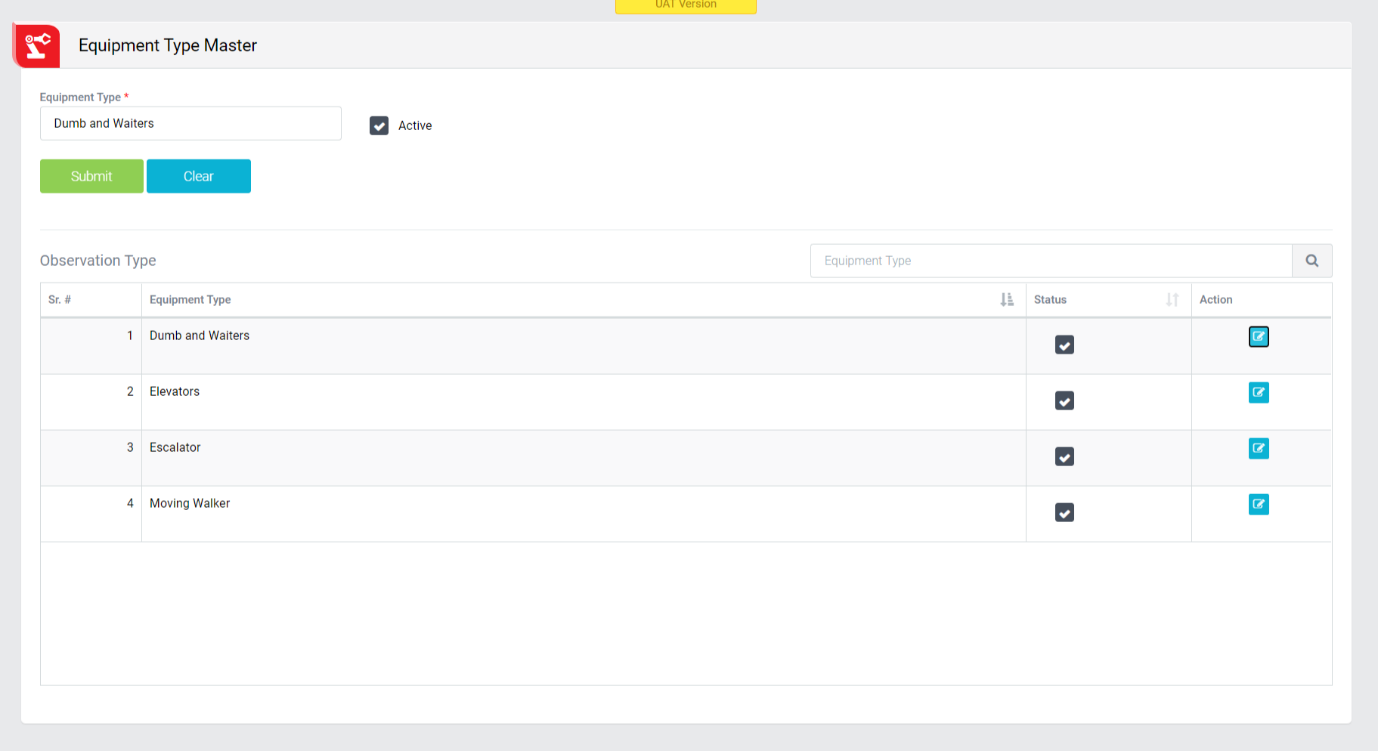
Image 2
- To update/edit existing equipment type, click on “Edit” button.
- Change the equipment type details as per requirement.
- Click Update button to update existing holiday.
- Click Clear button to clear the details to facilitate entry of a new equipment type.
VIEW EXISTING EQUIPMENT TYPE

Image 3
- Click Equipment Type header on table to view the Equipment Type in ascending/descending order.
- Equipment Type can be made Active/In-Active by clicking “Active” button in table.
EMAIL GROUP CONFIGURATION
Objective: It allows Administrator to add email group configuration. Update/view existing email group configuration in the system.
CREATE NEW EMAIL GROUP CONFIGURATION

Image 1
- To configure new Email Group, open Email Group Configuration Master screen from configuration menu.
- Select Branch, Module from dropdown.
- Enter Group Name.
- Check/uncheck “Active” check box to make Email Group active/inactive.
- Check/uncheck “Is Corporate” check box to make Email Group is Corporate.
- Click on “Add Employee” button to add list of employees in Email Group.
- Click Save button to save the Email Group details.
- Click Clear button to clear all the entry fields.
- Newly created Email Group is displayed once it is saved.
UPDATE EXISTING EMAIL GROUP
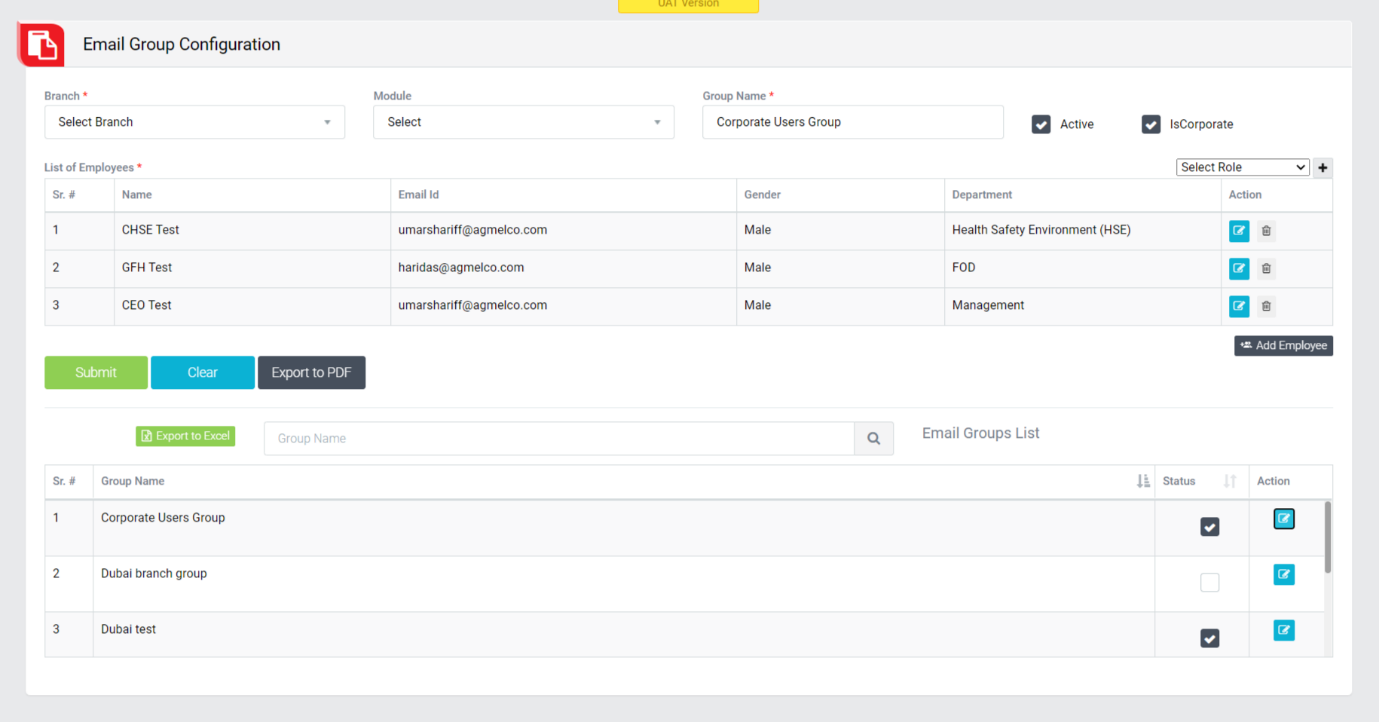
Image 2
- To update/edit existing email group, click on “Edit” button.
- Change the email group details as per requirement.
- Click Update button to update existing email group.
- Click Clear button to clear the details to facilitate entry of a new email group.
VIEW EXISTING EMAIL GROUP
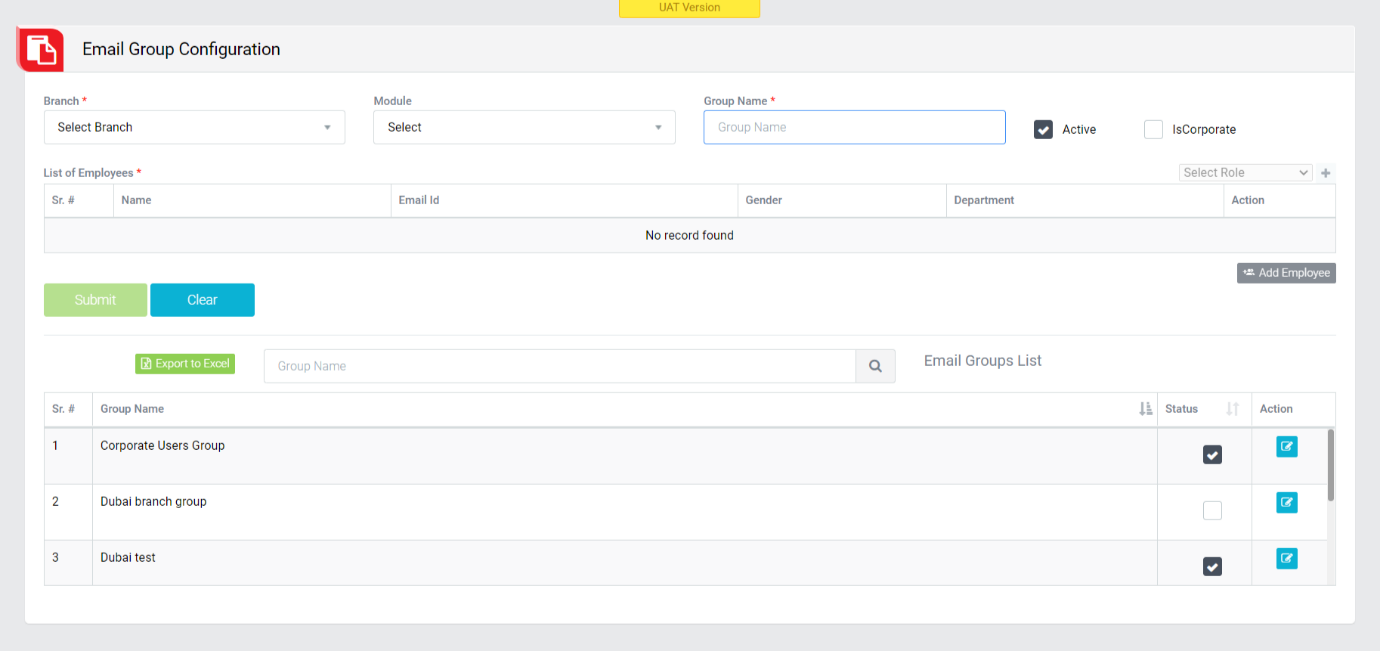
Image 3
- Click Group Name header on table to view the Group Name in ascending/descending order.
- Group Name can be made Active/In-Active by clicking “Active” button in table.
HOLIDAY MASTER
Objective: It allows Administrator to declare holiday(s). Update/view existing holiday(s) in the system.
- It allows Administrator to create holidays(s). Update/view existing holiday(s) in the system.
CREATE NEW HOLIDAY

Image 1
- To configure new Holiday, open Holiday Master screen from configuration menu.
- Select Branch Name from dropdown.
- Select From Date and To Date from Date.
- Enter Description.
- Check/uncheck “Active” check box to make a holiday active/inactive.
- Click Save button to save the holiday details.
- Click Clear button to clear all the entry fields.
- Newly created holiday is displayed once holiday is saved.
UPDATE EXISTING HOLIDAY
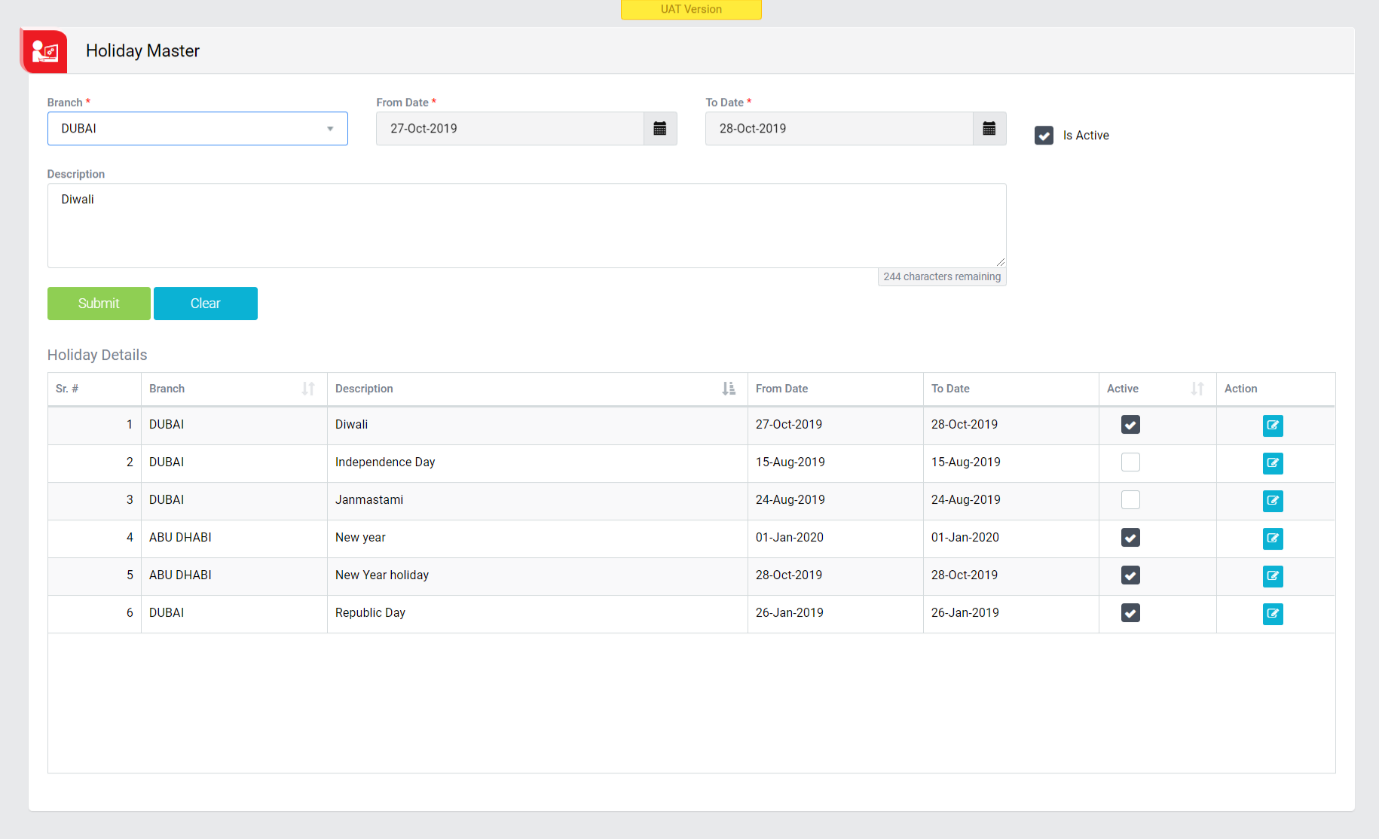
Image 2
- To update/edit existing holiday, click on “Edit” button.
- Change the holiday details as per requirement.
- Click Update button to update existing holiday.
- Click Clear button to clear the details to facilitate entry of a new holiday.
VIEW EXISTING HOLIDAY
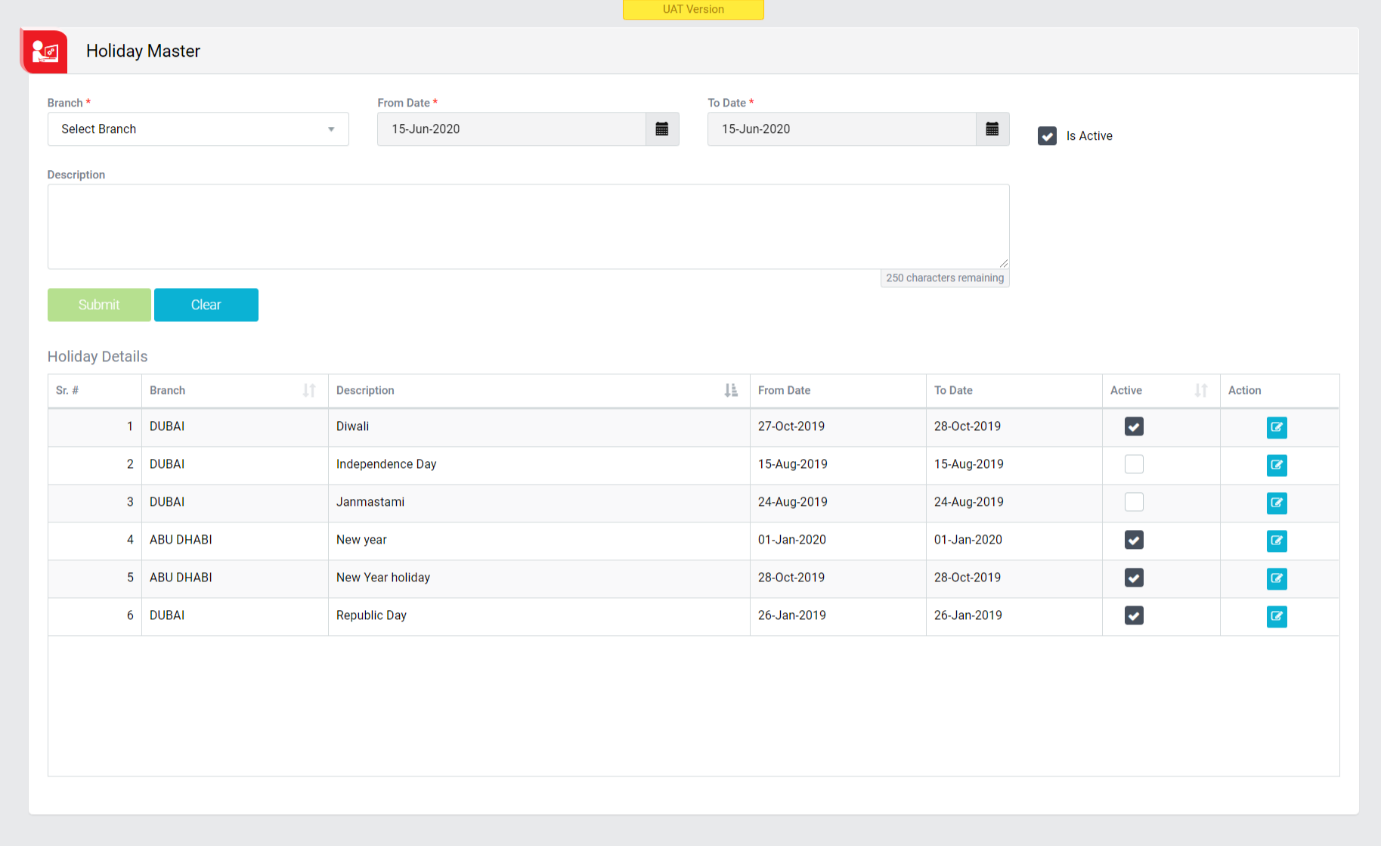
Image 3
- Click Branch and Description header on table to view the Branch and Description in ascending/descending order.
- Holiday can be made Active/In-Active by clicking “Active” button in table.
WORKING DAY MASTER
Objective: It allows Administrator to declare working day(s). Update/view existing working day(s) in the system.
- It allows Administrator to create working day(s). Update/view existing working day(s) in the system.
CREATE NEW WORKING DAY

Image 1
- To configure new Working day, open Working Day Master screen from configuration menu.
- Select Branch Name from dropdown.
- Select From Day and To Day from days.
- Enter Time Zone.
- Select Start Time and End Time.
- Check/uncheck “Active” check box to make a working day active/inactive.
- Click Save button to save the working day details.
- Click Clear button to clear all the entry fields.
- Newly created working day is displayed once working day is saved.
UPDATE EXISTING WOEKING DAY
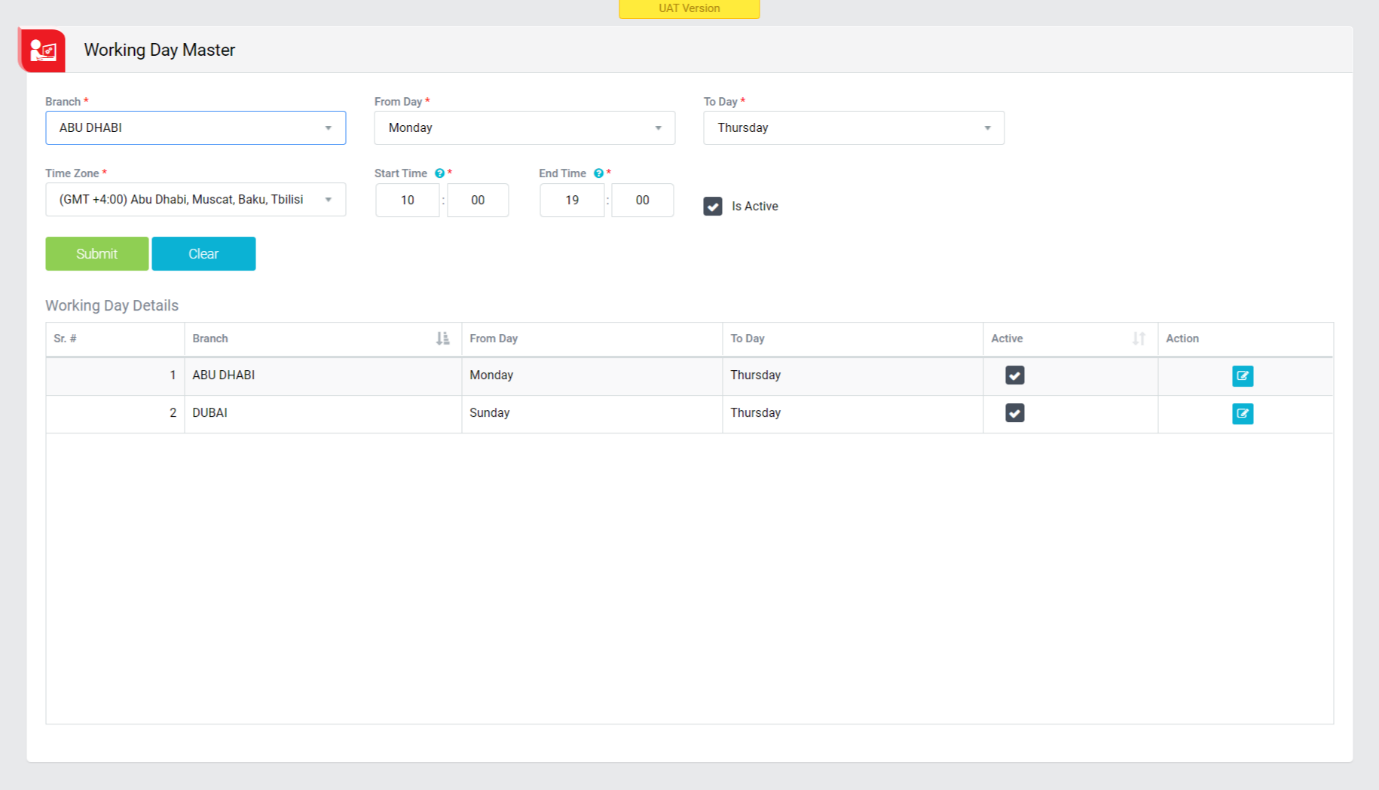
Image 2
- To update/edit existing working day, click on “Edit” button.
- Change the working day details as per requirement.
- Click Update button to update existing working day.
- Click Clear button to clear the details to facilitate entry of a new working day.
VIEW EXISTING HOLIDAY

Image 3
- Click Branch, From Date and To Date header on table to view the Branch, From Date and To Date in ascending/descending order.
- Working Day can be made Active/In-Active by clicking “Active” button in table.