Incident
Objective: To report occurrence of any incident within the plant during day-to-day activity. It allows user to report, review and approve/reject incident using the system.
Below steps to be followed to complete an incident report:
- Report Incident : To create/report new incident. Anyone whose has access to the system can report an incident.
- Review Incident: To review the created incident by “Branch HSE Head”.
- Approve FIR and identify the need to conduct investigation.
- Identify investigation Team member: Identify investigation. Any one role will investigate the task.
- Incident Investigation: Investigation will be done by Investigation team members.
- Review Incident Investigation: by selected person of Branch HSE Head.
- Review Incident Investigation by Department Head: Selected person from Department Head will Review the investigation and send for Branch Head Review.
- Review Incident Investigation by Branch Head: Selected person from Branch Head will approve and send for Corporate HSE Review.
- Approved by Corporate HSE : Selected person of Corporate HSE will approve investigation with or without comment.
REPORT INCIDENT
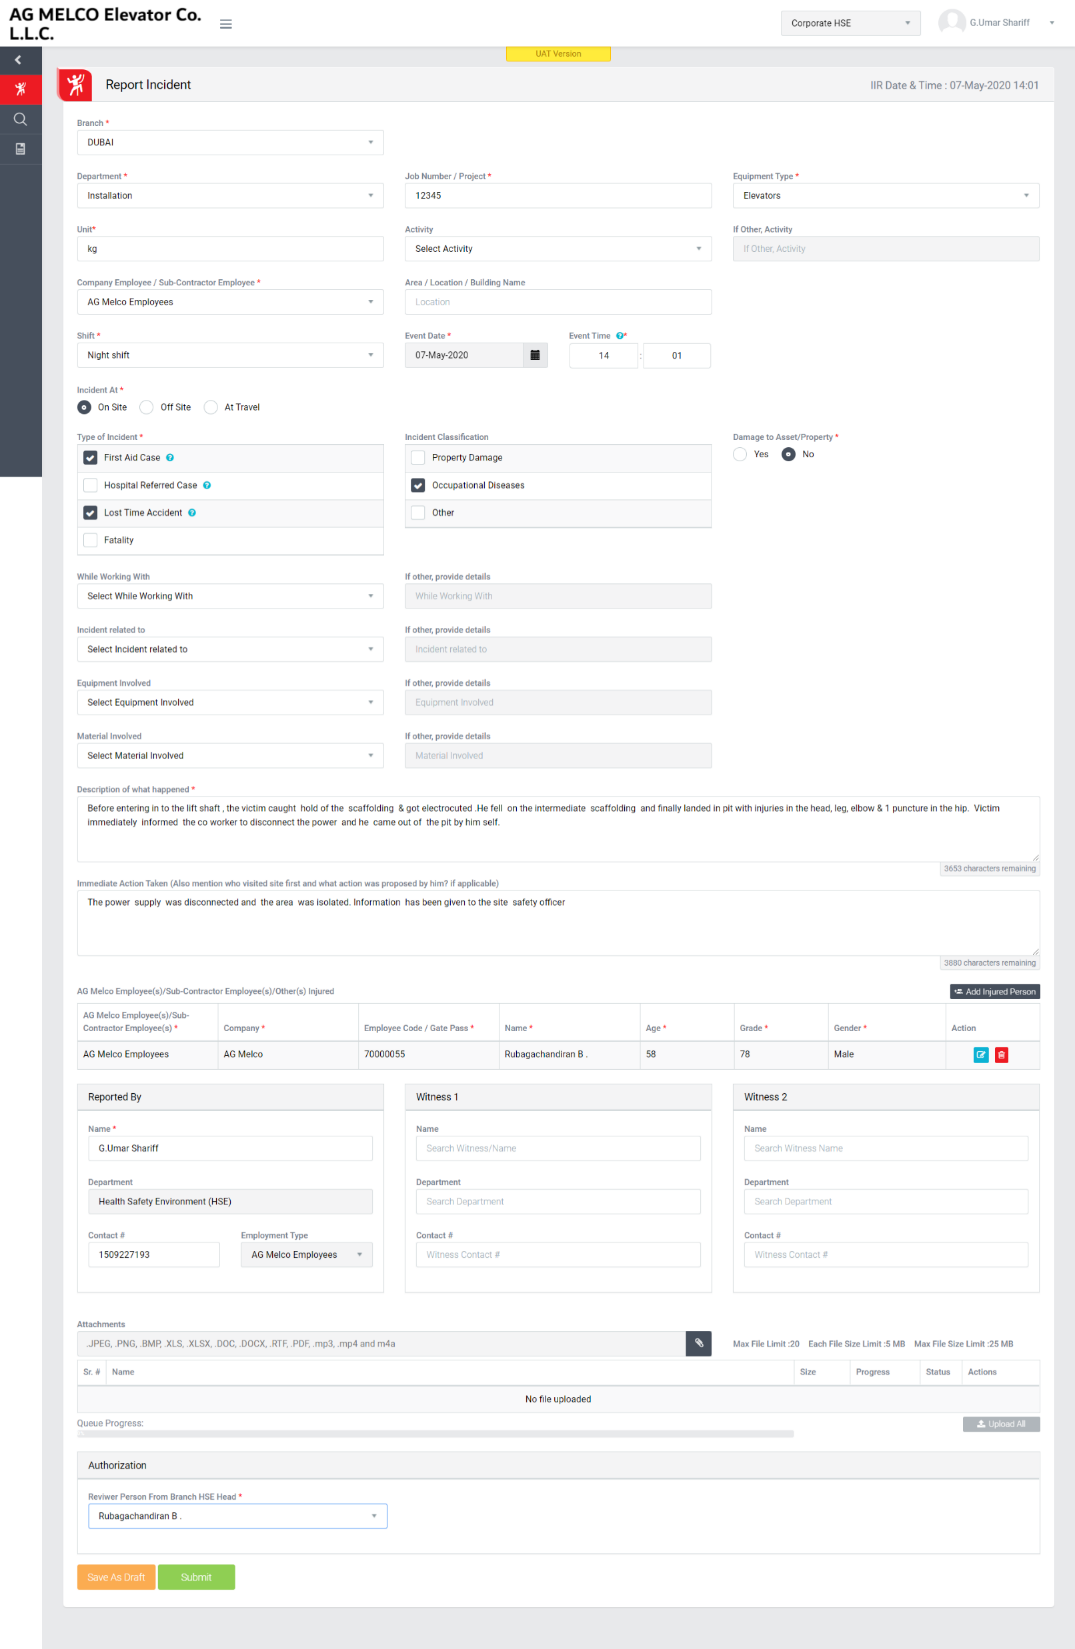
Image 1
- Select the Branch, Department, Job Number/ Project, Company Employee/Sub-Contractor Employee, Shift and Equipment Type from drop down list which are mandatory to select.
- If Company Employee/Sub-Contractor Employee is selected as Sub-Contractor Employee then select Sub-Contractor Compony from provided drop down list.
- Select Incident at as On Site, Off Site OR At Travel. (On Site is selected by default.)
- Select “Type of Incident” from multi selection check box. Its compulsory to select.
- Click the small icon beside each and every Type of Injury to view it’s definition in a pop up screen.
- Select “Sub Category” from multi selection check box.
- Select “Event Date” and enter “Event Time”.
- Select “Damage to Asset/Property” as Yes / No. (No is selected by default)
- Select Working with while, Incident related to, Equipment Involved and Material Involved. (If any of above is selected as Other then it is compulsory to provide details)
- Enter “Description of what happened” which is mandatory to enter. (Maximum 4000 characters allowed to enter)
- Enter “Immediate Action Taken (Also mention who visited site first and what action was proposed by him? if applicable)” which is not mandatory to enter. (Maximum 4000 characters allowed to enter)
- Click “Add Injured Person” button to add injured person who are injured in an incident.
- In “Injured Person Involved” area select “Employee(s)/Contractor(s)” from drop down list.
- Enter “Contractor” if “Employee(s)/Contractor(s)” is selected as contractor. (Contractor name will be displayed automatically when first 3 characters are typed)
- Enter Employment Type, Employee Code/Gate Pass, Company, Employee Name, Age, Grade and Gender. (All are mandatory to enter)
- Click Save button to save the entry and Delete button to delete the entry.
- After save data click Edit button the make changes in the entry details.
- Enter “Incident Reported By”. Name, Department and Contact will be populated automatically the person currently login the system.
- Enter Name, Department and Contact in “Witness 1”.
- Enter Name, Department and Contact and select First Reporting via from drop down list in “Witness 2”.
- “Reviewer Person from Branch HSE Head” will be populated automatically according to the selection of Branch and Department.
- Select person from drop down list.
- Click Attach button to select file as attachment.
- Click Upload button to upload the attached file and click Delete button to delete the file. (Each attachment files size upload limit up to 5MB and number of file attachment allow up to 20. Attachment files extension would be allowed such as “.JPEG, .PNG, .BMP, .XLS, .XLSX, .DOC, .DOCX, .RTF, .PDF, .MP3, .MP4 and .M4A”)
- In-case of multiple attachments click “Upload All” button to upload all attached files/images at a time.
- Click “Save” button to save the entered data.
- Click “Save As Draft” button to save the entered data without send for review.
Note :
- The fields marked with * are mandatory to be filled.